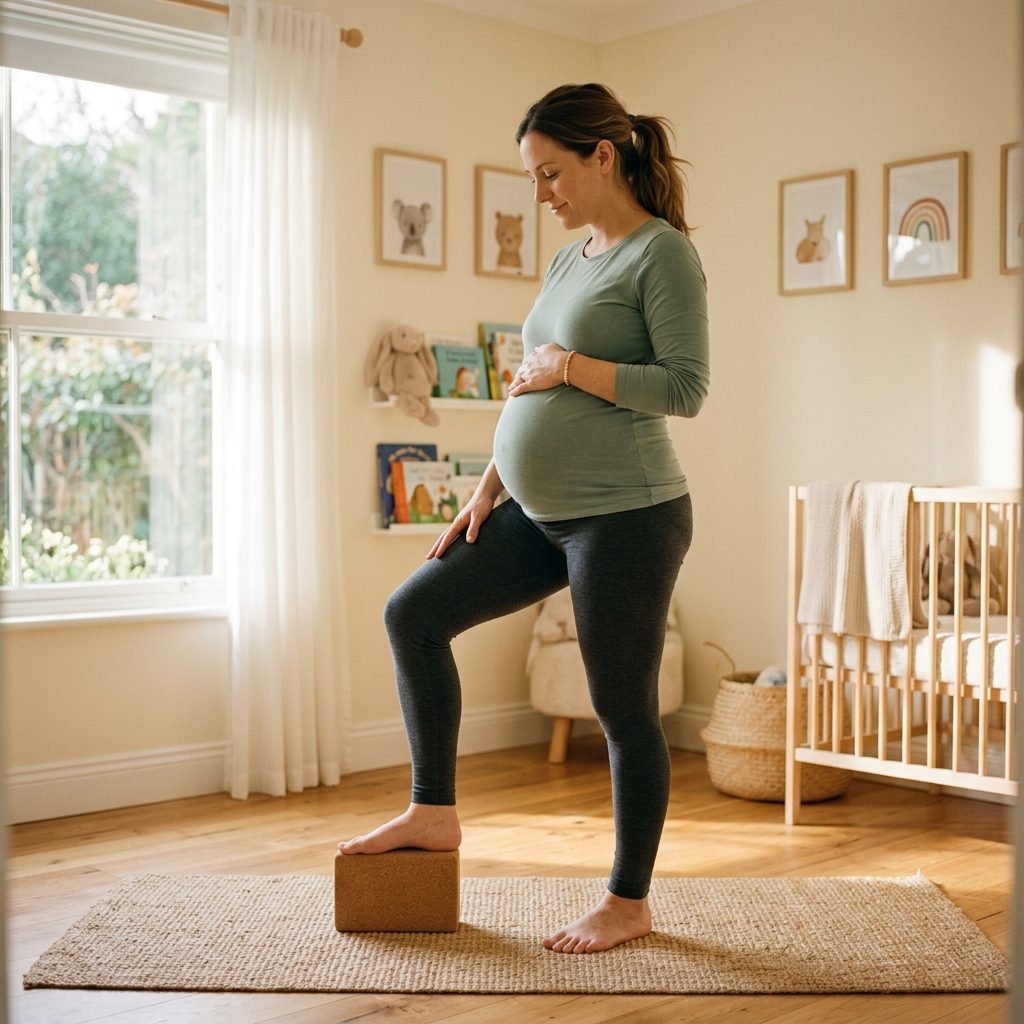
Simple Hip Hike Stretches to Help Open the Mid-Pelvis and Speed Up Labor
Welcome, Mama: Let’s Make Some Room for Baby
Hello, lovely. If you are reading this, you are likely in that beautiful, expectant window where every flutter and every Braxton Hicks contraction feels like a whisper from your baby saying, ‘I’m getting ready.’ As a doula, I want you to know that your body is an incredible, intuitive machine. However, sometimes the ‘machinery’ of the pelvis needs a little gentle guidance to create the smoothest path possible for your little one’s arrival.
When we talk about labor ‘stalling’ or taking a bit longer than expected, it is often because the baby is navigating a tight spot in the mid-pelvis. This middle section of your birth canal is where the baby needs to perform a crucial internal rotation to fit through. By practicing simple hip hike stretches, you are essentially acting as a gentle traffic controller, opening up the transverse (side-to-side) diameter of your pelvis and inviting your baby to descend. Let’s dive into how you can use these movements to feel empowered, comfortable, and ready for the big day.
Understanding the Mid-Pelvis: The Gateway to Birth
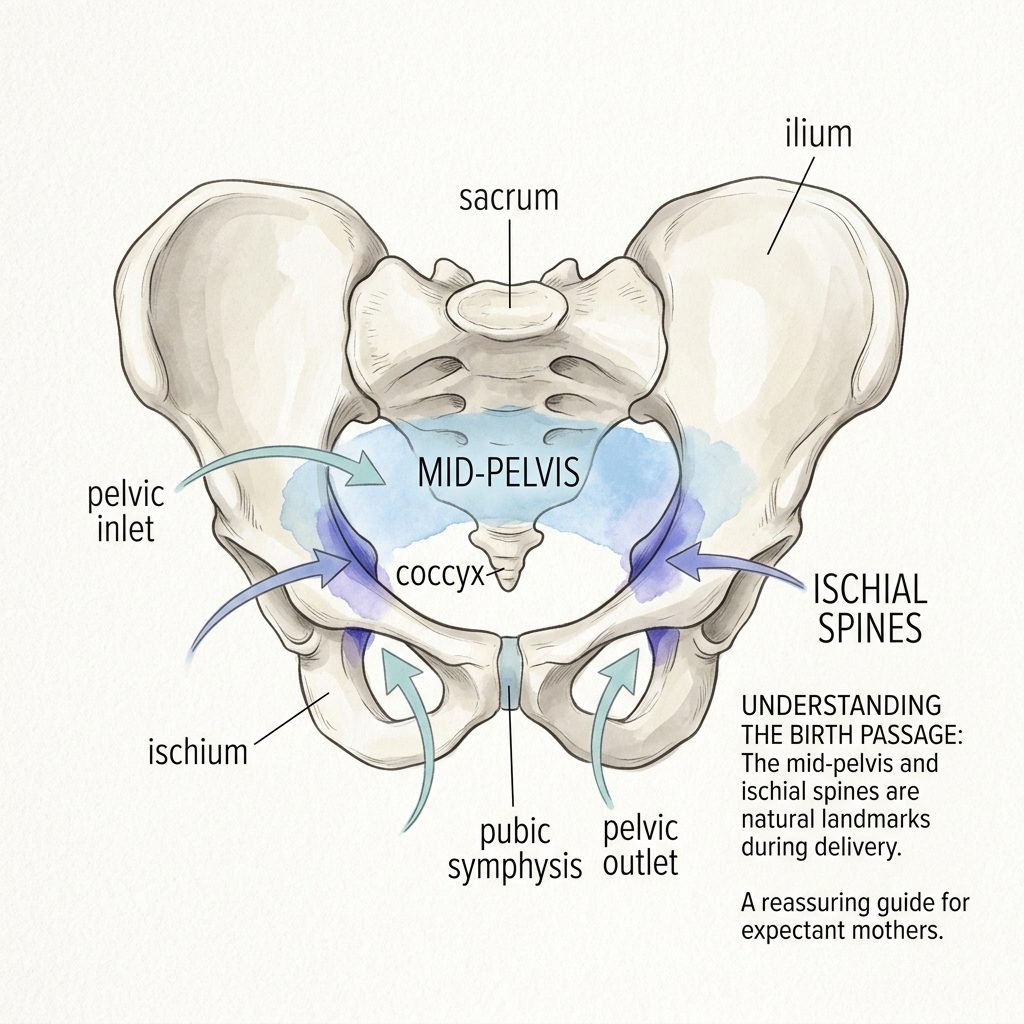
To understand why hip hikes are so effective, we first need to look at the anatomy of your gorgeous pelvis. Think of your pelvis not as one solid bone, but as a dynamic, shifting cradle. It is divided into three main ‘stations’ or planes: the inlet (the top), the mid-pelvis (the middle), and the outlet (the bottom).
The mid-pelvis is often the narrowest part of the journey. It is bordered by the ischial spines—those little ‘bony bits’ you might feel if you sit on your hands. For your baby to pass through this section, they usually need to be in an ‘occiput anterior’ position (facing your back). If the mid-pelvis is tight, the baby might stay high or rotate slowly, leading to a longer labor. Hip hikes create asymmetry, which is the secret sauce to pelvic mobility. When you lift one hip, you shift the sacrum and pull on the ligaments, momentarily increasing the space between those ischial spines.
| Pelvic Level | Goal for Baby | Movement Strategy |
|---|---|---|
| Inlet (Top) | Engagement | External rotation of hips (knees out) |
| Mid-Pelvis (Middle) | Rotation & Descent | Asymmetric movements (Hip Hikes) |
| Outlet (Bottom) | Crowning | Internal rotation of hips (knees in, heels out) |
The Standing Hip Hike: A Step-by-Step Guide
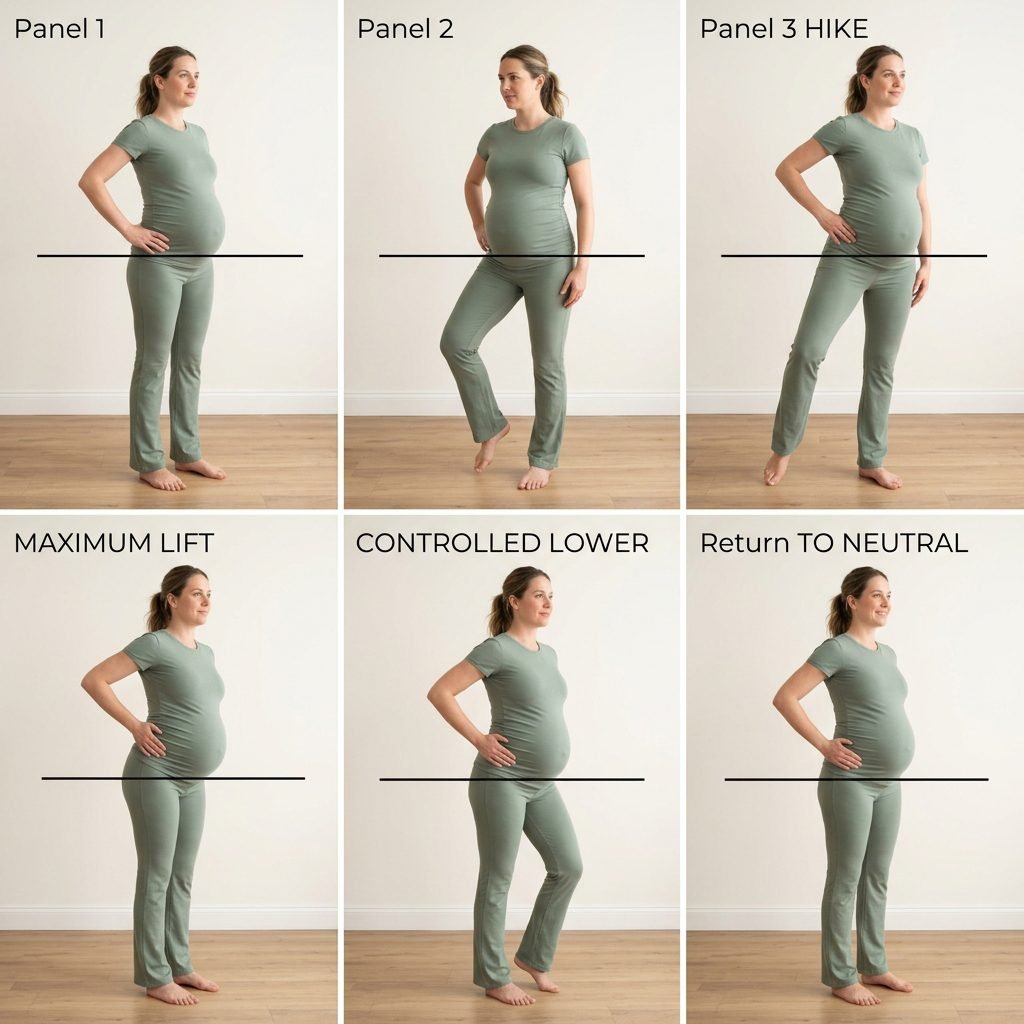
This is my absolute favorite move to teach in prenatal sessions because you can do it anywhere—at the kitchen counter, while brushing your teeth, or even leaning against a hospital bed. It is subtle but incredibly powerful for releasing the quadratus lumborum (QL) muscle and shifting the pelvic bones.
- Stand tall with your feet hip-width apart. You may want to place your hands on a sturdy surface like a table or dresser for balance.
- Shift your weight entirely onto your left leg, keeping that knee ‘soft’ (not locked).
- Without bending your right knee, use your waist muscles to ‘hike’ your right hip up toward your ribcage. Imagine you are trying to make your right leg shorter than the left.
- Hold for 3 to 5 seconds, feeling the stretch in your lower back and the shift in your pelvis.
- Slowly lower the hip back down, and even let it drop slightly below the level of the other hip if it feels good.
- Repeat 10 times on each side.
“I am creating a wide, open path for my baby. My body knows how to move, and I am leaning into that wisdom with every breath.”
The Stair Hike: Using Gravity to Your Advantage
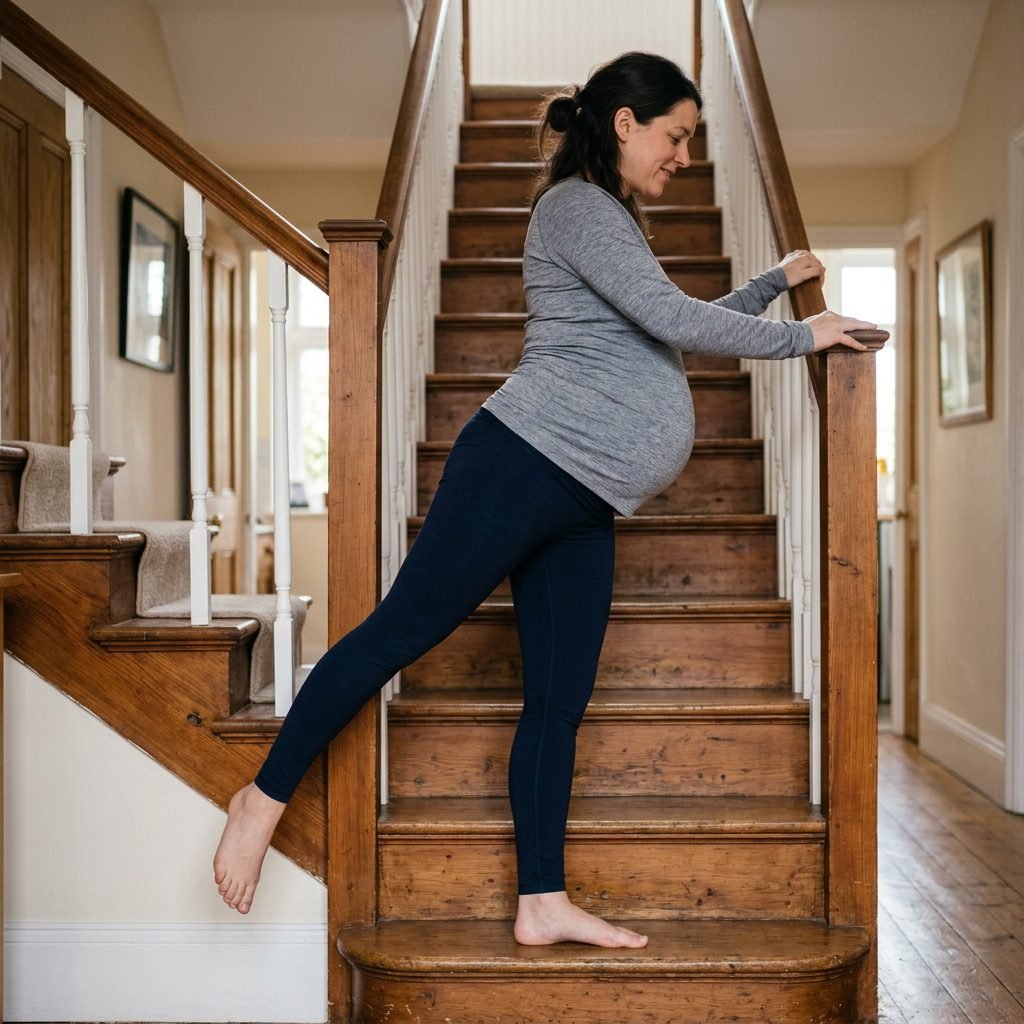
If you have stairs in your home, you have the perfect labor-prep tool! The stair hike uses the height of the step to deepen the pelvic shift. This is particularly useful if your doula or midwife mentions that the baby is ‘asynclitic’ (tilting their head) or if labor progress has slowed down in the middle stages.
How to Perform the Stair Hike Safely:
- Stand sideways on the bottom step of a staircase.
- Place your ‘inside’ foot (the one closest to the stairs) firmly on the first or second step.
- Keep your ‘outside’ foot dangling in the air off the side of the step.
- Slowly lower your dangling foot toward the floor (you don’t have to touch it) and then hike it up as high as you can toward your shoulder.
- Safety Tip: Always hold onto the banister! Your center of gravity is shifting, and we want you feeling secure.
By doing this, you are encouraging the baby to tuck their chin and find the path of least resistance. Practice this for 5 minutes twice a day to keep those pelvic ligaments supple and ready.
Partner-Assisted Hip Hikes and Comfort Measures

Labor is a team sport, Mama! Your partner can help you achieve a deeper release during hip hikes, which is especially soothing if you are experiencing back labor. When a partner helps, it allows you to fully relax your muscles, making the stretch more effective.
The Partner-Supported Lean:
- Stand facing your partner and wrap your arms around their neck or shoulders (the ‘slow dance’ position).
- Allow your partner to place their hands firmly on your hips.
- As you perform your hip hike, your partner can apply a gentle upward pressure on the hiked hip and a downward grounding pressure on the standing hip.
- Encourage your partner to use a slow, rhythmic sway. This movement combined with the hike helps the baby navigate the mid-pelvis during active labor.
| Do’s for Partners | Don’ts for Partners |
|---|
When to Use Hip Hikes: A Labor Timeline
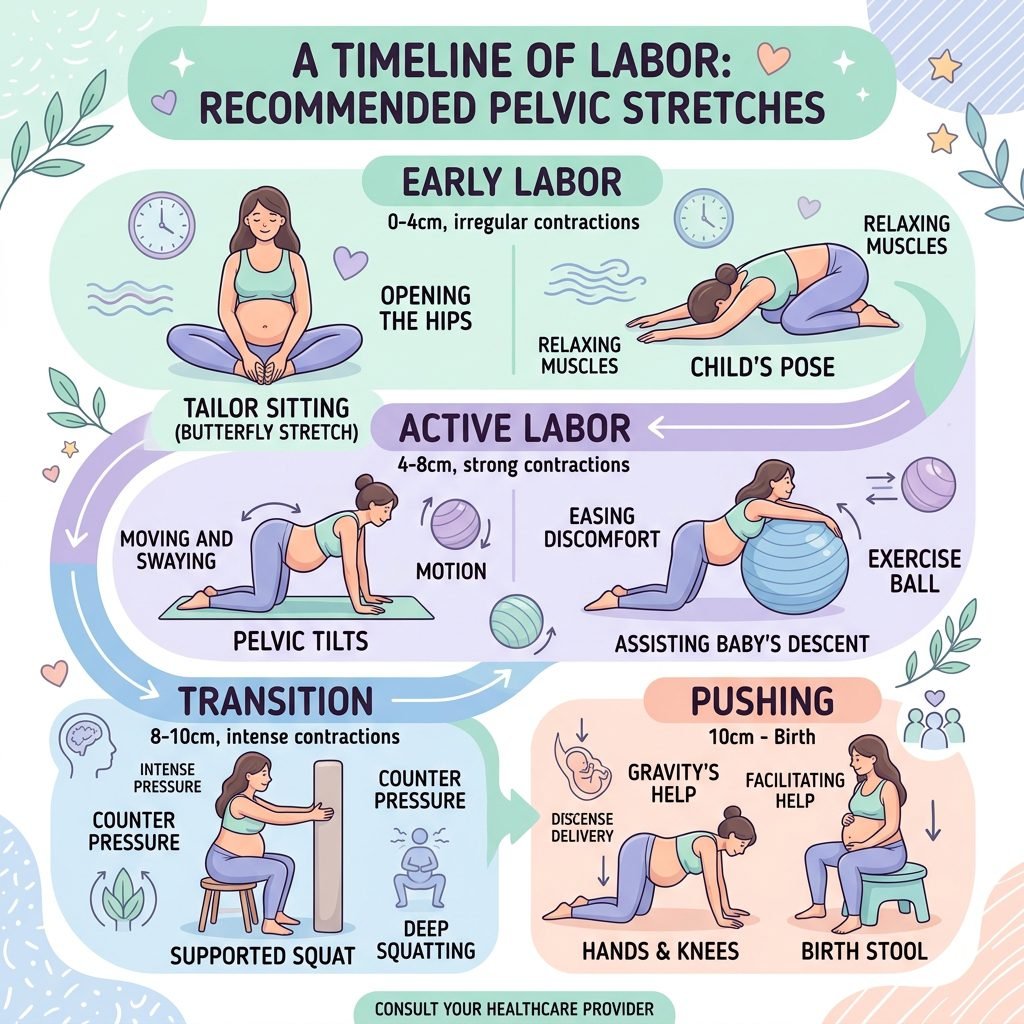
Knowing when to use these stretches is just as important as knowing how. While you can start practicing hip hikes in your second trimester to maintain flexibility, they become your ‘secret weapon’ once labor begins.
Early Labor (0-6cm):
During this phase, hip hikes help the baby settle into the pelvis. Do them casually throughout the day. Keep your movements light and rhythmic. If you feel a contraction, try a few hikes to see if it helps the sensation feel more productive.
Active Labor (6-10cm):
This is when the baby is likely in the mid-pelvis. If your contractions are strong but the baby isn’t descending, get asymmetric! One foot on a stool, one foot on the floor, and hike that hip. This is the time to use the ‘Stair Hike’ or the ‘Yoga Block Hike’ between contractions to keep the pelvis dynamic.
The ‘Stall’ or Plateau:
If your dilation stops or the baby’s station doesn’t change for a few hours, hip hikes (especially when combined with a side-lying release) can often be the ‘key’ that unlocks the next phase. Movement is medicine.
Styling for Movement: Comfort-First Maternity Gear

You can’t move freely if your clothes are restricting you! As a maternal fashion stylist, I always recommend ‘movement-ready’ pieces for the third trimester and early labor. Look for high-waisted maternity leggings with a ‘U-shaped’ belly panel that supports without compressing.
- Fabric: Choose breathable, moisture-wicking blends (like nylon/spandex) that allow for a full range of motion during those deep hip hikes.
- Footwear: Practice your stretches barefoot or in ‘grip socks’ to ensure you don’t slip, especially when using stairs or yoga blocks.
- Support: If you feel heavy pressure in your pubic bone (SPD), consider wearing a light maternity support belt while doing standing hikes to stabilize the symphysis pubis.
Conclusion
Trust Your Body’s Rhythm
Mama, as you prepare for the arrival of your little one, remember that your pelvis is not a fixed cage—it is a gateway designed to open. These simple hip hike stretches are more than just exercises; they are a way to communicate with your body and your baby, creating space and ease for the journey ahead. Whether you are practicing in your living room today or using these moves in the birth suite next week, know that you are doing an incredible job.
Be gentle with yourself, listen to your breath, and trust the process. You are strong, you are capable, and you are almost there. We are all rooting for you!