
The Cold Therapy Secret: How Cooling Relief Can Get You Through Labor Transition
Oh, sweet mama. If you are deep into your third trimester, you have likely heard the whispers (or the loud, dramatic tales) about the “transition” phase of labor. It is the shortest, but undeniably the most intense part of childbirth. As a doula and maternal wellness expert, I am here to hold your hand, look you in the eye, and tell you something crucial: you are built for this. Your body knows exactly what to do. But knowing you are strong doesn’t mean you have to tough it out without an arsenal of comfort measures. Today, we are going to talk about one of my absolute favorite, evidence-based, and highly effective tools for the labor room: cold therapy.
When we think of labor comfort, we often picture warm baths, heating pads, and cozy environments. While warmth is incredible for early and active labor, transition brings a completely different physiological shift. Your hormones are surging, adrenaline is spiking, and suddenly, you might feel like you are burning up from the inside out. This is where the cold therapy secret comes in. Targeted cooling relief can be the anchor that keeps you grounded when the waves of contractions feel overwhelming. In this comprehensive guide, we will explore exactly why cold therapy works, how your birth partner can expertly apply it, and how to build the ultimate cooling kit for your hospital bag. Take a deep breath, drop your shoulders, and let’s dive into this game-changing birth secret.
The Science of Shivers: Why Cold Therapy Works During Transition

To truly appreciate the magic of cold therapy, we have to understand what is happening in your body during transition. Transition is the phase of labor where your cervix dilates from 8 to 10 centimeters. It is the bridge between the opening of your cervix and the pushing phase. During this time, your body releases a massive surge of adrenaline and noradrenaline to give you the energy needed for the final stage of birth. This hormonal cocktail often causes a sudden, intense spike in body temperature, hot flashes, nausea, and even uncontrollable shaking.
The Gate Control Theory of Pain
Beyond just cooling you down, cold therapy acts as a profound form of pain management thanks to the Gate Control Theory of Pain. In simple terms, your nerve fibers can only process so much information at once. Cold sensations travel along different, faster nerve pathways than pain sensations. By applying intense, localized cold to specific areas of your body, you are essentially “closing the gate” on the pain signals traveling to your brain. The brain focuses on the crisp, shocking relief of the cold rather than the intensity of the contraction.
The Vagus Nerve Connection
Applying cold to the back of the neck or the chest also stimulates the vagus nerve. The vagus nerve is the command center of your parasympathetic nervous system—the “rest and digest” system. When stimulated by cold, it rapidly lowers your heart rate, reduces anxiety, and helps pull you out of the panic or “fight or flight” state that transition often triggers. This is why a simple cool washcloth can instantly make you feel more grounded, centered, and ready to tackle the next wave.
The Doula’s Playbook: Where to Apply Cold for Maximum Relief

Having ice on hand is only half the battle; knowing exactly where to place it makes all the difference. During transition, your sensory preferences might change by the second. What felt good five minutes ago might suddenly feel irritating. This is perfectly normal! As a doula, I recommend having a mental map of “cooling zones” so your partner can rotate through them based on your cues.
The Top 4 Cooling Zones for Labor
- The Nape of the Neck: This is the ultimate grounding spot. Placing a highly chilled, damp washcloth right at the base of the skull stimulates the vagus nerve and instantly cools the blood flowing to the brain, reducing nausea and dizziness.
- The Forehead and Temples: During intense contractions, many laboring mothers scrunch their faces and hold tension in their jaws. A cold compress across the forehead encourages the facial muscles to relax. Remember: a relaxed face equals a relaxed pelvic floor!
- The Lower Back (Sacrum): If you are experiencing back labor (often due to baby’s position), alternating a heating pad with an ice pack can provide immense relief. The cold reduces inflammation and numbs the deep, aching sensation in the sacral area.
- The Chest and Collarbone: When adrenaline spikes, you might feel a sudden flush of heat across your chest. A quick wipe down with a cool cloth over the chest can “shock” your respiratory system into taking a deep, restorative breath.
“I am offering you this cold cloth to help you reset. Breathe the heat into the cloth, and let the cold wash over you. You are safe, and you are doing it.” – A perfect script for your birth partner to use while applying the compress.
Creating Your Ultimate Labor Cooling Kit
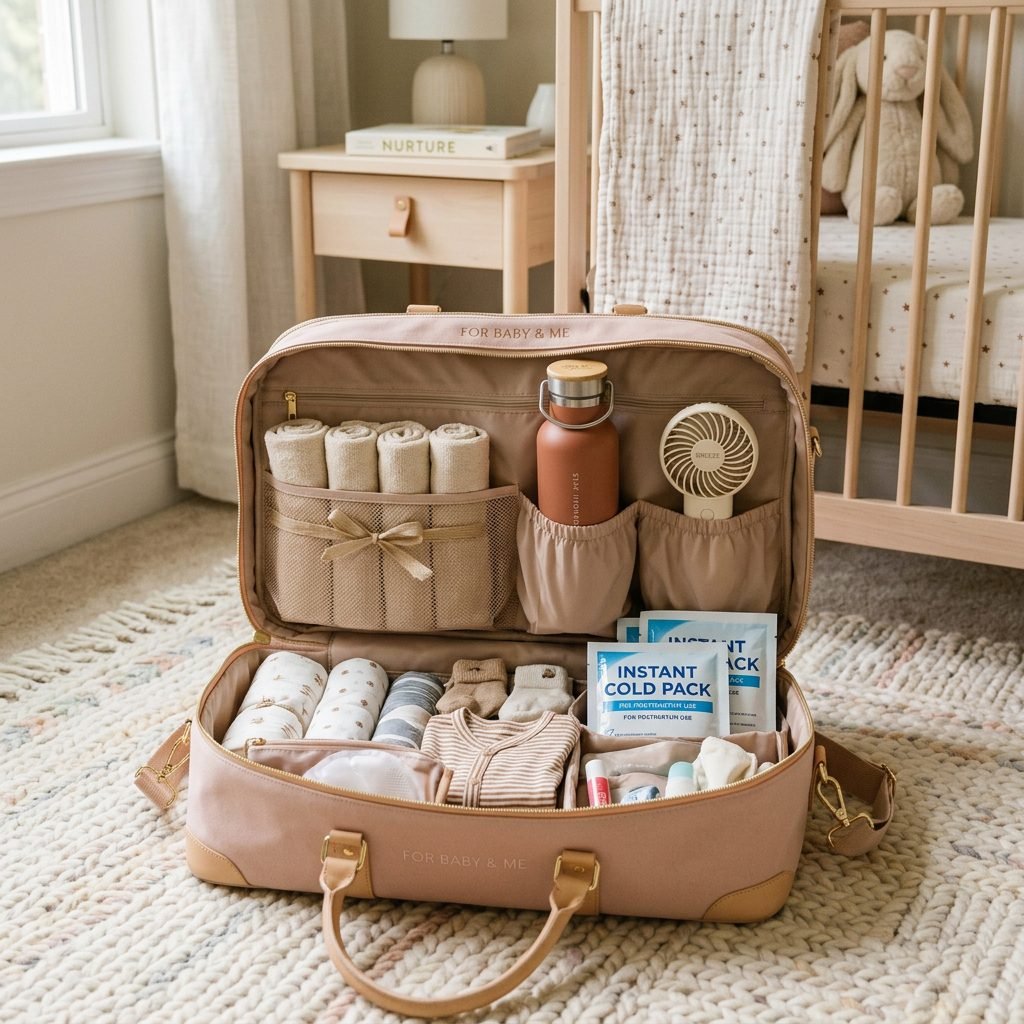
Preparation is key, mama. You do not want your partner frantically searching for ice chips in the hospital hallway while you are in the throes of transition. Building a dedicated “Cooling Kit” within your hospital or birth center bag ensures that relief is always an arm’s reach away. Let’s break down exactly what you need to pack to ensure you have a continuous loop of cold therapy available.
Essential Items for Your Cooling Kit
- Bamboo Washcloths: Pack at least 6-8 small, incredibly soft washcloths. Bamboo is ideal because it retains water well and feels luxurious against sensitive skin.
- An Insulated Thermos or Cooler: Bring a high-quality, large insulated water bottle (like a Yeti or Stanley) specifically to hold ice water. Your partner will use this to continuously re-chill the washcloths without having to leave the room.
- Instant Perineal Cold Packs: While these are traditionally for postpartum recovery, “cracking” an instant ice pack and placing it on your lower back is a fantastic hack for instant, mess-free cold therapy during labor.
- A Portable Stroller Fan: A clip-on, battery-operated fan is a lifesaver. You can clip it to the hospital bed rail, the IV pole, or have your partner hold it directly on your face while you breathe through a contraction.
- Peppermint Essential Oil: (Optional and only if you enjoy the scent). Adding a single drop of peppermint oil to your ice water bowl can enhance the cooling sensation and significantly reduce transition-induced nausea.
| Cooling Tool | Best Labor Phase to Use | Primary Benefit |
|---|---|---|
| Damp Washcloth on Neck | Transition (8-10cm) | Stimulates vagus nerve, reduces nausea and hot flashes. |
| Instant Ice Pack on Sacrum | Active Labor / Transition | Numbs deep lower back pain, distracts nerve pathways. |
| Portable Clip-on Fan | Pushing Phase | Provides continuous air flow during intense physical exertion. |
| Ice Chips (Oral) | Entire Labor Process | Keeps mouth hydrated without overfilling a nauseous stomach. |
Partner Power: Step-by-Step Guide to Delivering Cold Therapy

This section is for your birth partner. Partners, listen up: you are the guardian of the cooling kit! During transition, the laboring mother may not be able to verbalize exactly what she needs. She might be in “labor land,” a deep, primal state of focus. Your job is to anticipate her needs, read her body language, and offer cold therapy proactively. Here is your step-by-step doula protocol for being the ultimate support system.
The Washcloth Rotation Method
- Prep the Station: As soon as labor intensifies, fill your insulated thermos or a hospital basin with ice and a little bit of water. Submerge 3-4 washcloths.
- The Wring-Out: When a contraction begins, pull a washcloth out and wring it out completely. It should be freezing cold but not dripping. Dripping water can be highly irritating to a laboring mother.
- The Approach: Always approach from the front or side so she can see you. Ask gently, “Can I place this on your neck?” If she nods or doesn’t object, place it firmly but gently. Do not rub; just hold it in place.
- The Swap: Washcloths absorb body heat quickly. After about 2-3 minutes, the cloth will be warm. Seamlessly swap it out for a fresh, icy one from the basin.
Dos and Don’ts of Labor Support
- DO offer ice chips between every few contractions. Say, “Take a bite of ice,” rather than asking an open-ended question like, “Do you want anything?”
- DON’T take it personally if she swats your hand away. During transition, sensory overload is real. If she says “Get it off,” remove it immediately without taking offense.
- DO combine cold therapy with verbal affirmations.
- DON’T apply raw ice directly to the skin. Always use a barrier like a washcloth to prevent skin irritation.
“You are doing beautiful work. The intensity you feel is your body bringing our baby closer. Breathe in the cool air, blow away the tension.”
Combining Cold Therapy with Breathwork and Movement

To maximize the effectiveness of cold therapy, we want to layer it with other proven labor tools: breathwork and movement. Cold therapy is passive (it happens to you), but breathing and movement are active (you do them). When you combine the two, you create a powerful synergy that helps you ride the waves of transition rather than fighting against them.
The Cold-Squat Synergy
Squatting is an incredible position for transition and pushing because it opens the pelvic outlet by up to 30 percent and uses gravity to help baby descend. However, it requires a lot of energy and can make you feel overheated quickly. Here is how to combine it with cold therapy:
- Get into Position: Hold onto your partner, a rebozo scarf tied to a sturdy door, or a squat bar on the hospital bed. Drop into a deep, supported squat as the contraction begins.
- Apply the Cold: As you drop down, have your partner immediately place the ice-cold washcloth on the back of your neck or hold the portable fan directly on your face.
- Engage the Breath: Use the 4-7-8 breathing technique. Inhale deeply through your nose for 4 seconds (focusing on the cold sensation), hold for 7 seconds (if comfortable), and exhale slowly through pursed lips for 8 seconds, blowing the heat out of your body.
- Rest and Reset: As the contraction fades, stand up slowly or move to your hands and knees. Have your partner remove the cold cloth so your body can return to a neutral temperature during the rest period.
Side-Lying with the Peanut Ball
If you are laboring with an epidural, or if you simply need to rest your legs, the side-lying position with a peanut ball between your knees is highly recommended. It keeps the pelvis open while allowing you to conserve energy. Because you are lying down, your partner can easily place a cold pack on your forehead and a warm pack on your lower back simultaneously. This “hot and cold” contrast therapy is a phenomenal way to confuse the pain receptors and provide deep, holistic comfort.
Conclusion
Transition is a storm, my beautiful friend, but it is a storm with a very clear, very beautiful end in sight. It is the final hurdle before you meet the tiny soul you have been growing for the past nine months. By packing your cooling kit, educating your partner, and understanding the incredible science behind cold therapy, you are taking active steps to advocate for your comfort and peace during birth. Remember, there is no award for suffering. Utilizing tools like cold washcloths, ice chips, and portable fans doesn’t make you any less tough; it makes you incredibly wise and in tune with your body’s needs. You are strong, you are capable, and you are so incredibly close to holding your baby. Trust your body, lean into the cooling relief, and ride those waves all the way to the shore.