The Dark-Moody Newborn Photo Secret: How to Shoot High-Contrast Portraits Using One Window
Oh, sweet mama, welcome to the beautiful, exhausting, deeply emotional blur that is the fourth trimester. If you are reading this while pinned beneath a sleeping baby, running on three hours of sleep, and wearing the same nursing tank top for the second day in a row—I see you, and you are doing an incredible job.
In these early days, you are likely staring at your newborn’s tiny features, desperate to memorize every single detail: the translucent peeling skin on their toes, the flutter of their pale eyelashes, the way their little lips part when they dream. You want to capture these fleeting moments, but the thought of packing a diaper bag, wrangling your postpartum body into “real” clothes, and driving to a professional photography studio feels entirely overwhelming.
As a doula and fellow mother, I am here to share a wonderful secret with you: you do not have to leave your house to capture breathtaking, professional-level newborn portraits. In fact, the most stunning, emotive, and timeless photos can be taken right in your living room using just one single window and your smartphone.
Welcome to the magic of dark and moody newborn photography. This style is characterized by deep shadows, rich contrast, and a profound focus on your baby. The best part? This technique completely hides the reality of your postpartum home. It doesn’t matter if there are breast pump parts on the coffee table or unfolded laundry on the sofa; the shadows will swallow the clutter, leaving only the pure, illuminated beauty of your newborn. Let’s create some magic together, step by beautiful step.
The Anatomy of a Dark & Moody Setup: Gathering Your Supplies
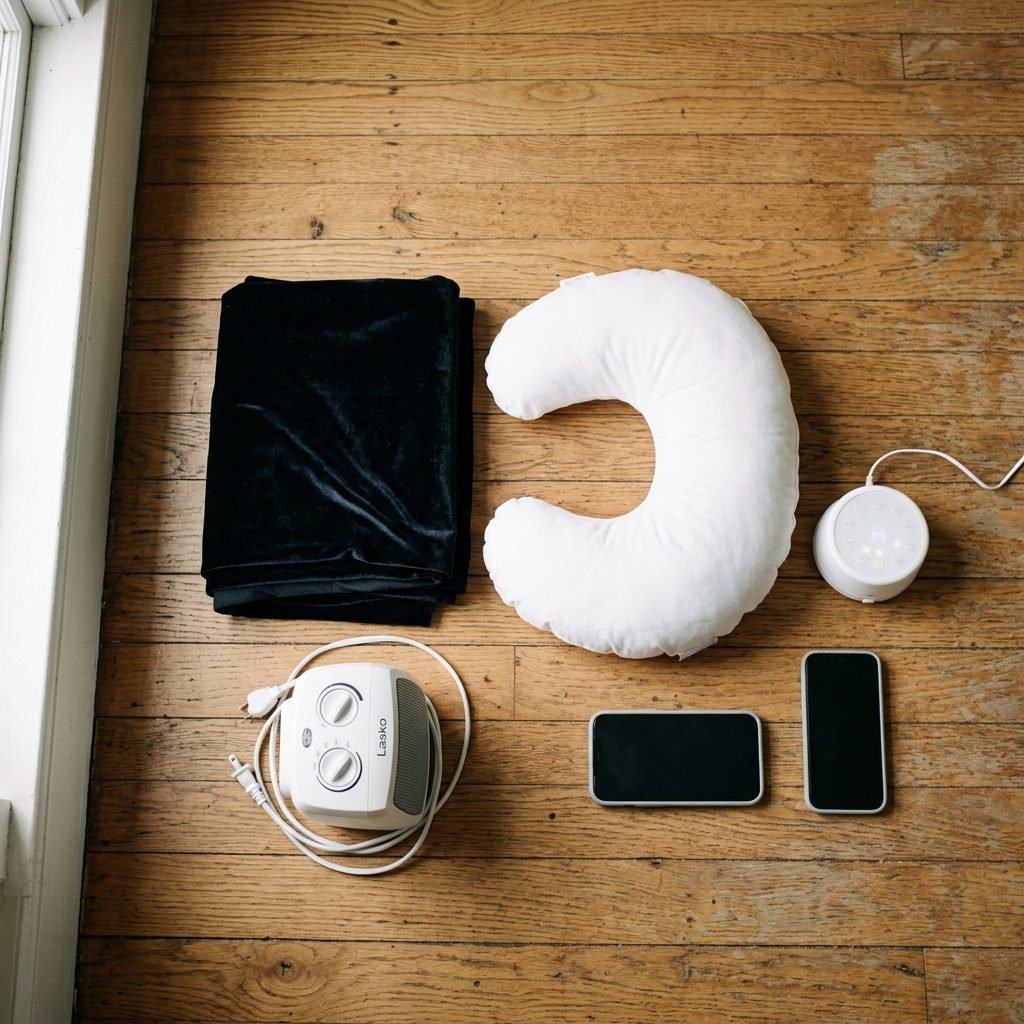
Before we even think about touching a camera, we need to build our nest. As a doula, my number one priority is always the safety, warmth, and comfort of your baby. The secondary goal is creating the perfect canvas for our shadows and light to dance upon. You do not need expensive studio gear to achieve this look. In fact, everything you need is likely already in your home or can be acquired for a few dollars.
The cornerstone of the dark and moody aesthetic is a light-absorbing background. We want a fabric that eats the light rather than reflecting it back. Velvet is your absolute best friend here. It is soft against your baby’s delicate skin and creates a bottomless, rich black background that makes your baby’s skin glow by contrast.
| Essential Item | Why You Need It (The Doula/Photo Logic) | Budget/Sourcing |
|---|---|---|
| Black Velvet Fabric (Approx. 2-3 yards) | Absorbs light perfectly, preventing distracting background reflections. Soft and warm for baby. | $10-$15 (Local craft store or Amazon) |
| Nursing Pillow (e.g., Boppy) | Provides a safe, contoured surface to support the baby’s head and body naturally. | Already own! |
| Waterproof Changing Pad Liner | Placed under the velvet to protect your pillows from the inevitable newborn blowouts or pee streams. | Already own! |
| Small Space Heater | Newborns cannot regulate their body temperature well. A warm environment keeps them sleepy and relaxed. | $20-$30 (Ensure it is kept at a safe distance) |
| White Noise Machine | Mimics the loud, whooshing sound of the womb, keeping baby in a deep, poseable sleep. | Already own! |
Remember, mama: Perfection is the enemy of connection. If your fabric has a few wrinkles, or if you are using a dark navy blanket instead of black velvet, it will still be beautiful. Give yourself immense grace during this process.
Mastering the One-Window Lighting Technique
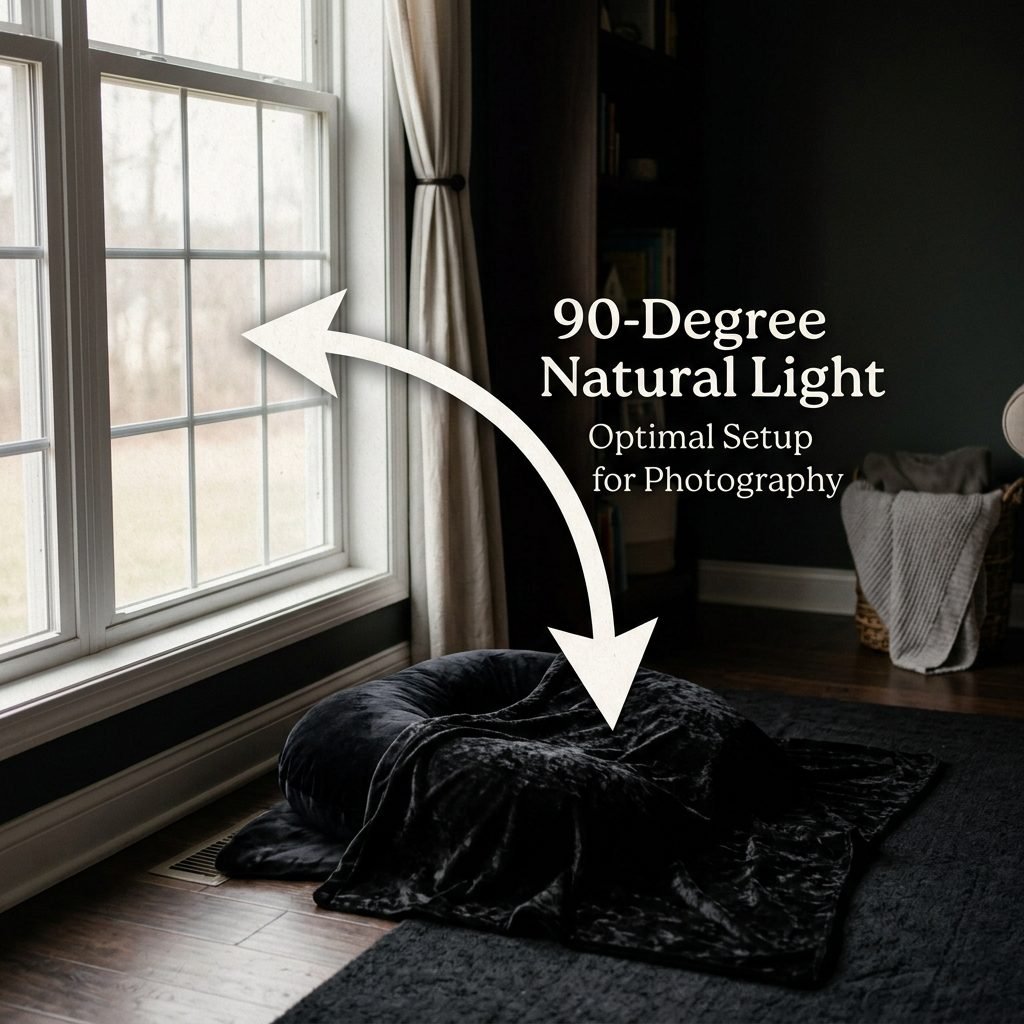
Lighting is the secret sauce of photography, and for the dark and moody look, we are going to use a technique called directional lighting. This means the light is only coming from one specific direction, allowing shadows to naturally fall across the opposite side of your baby’s face and body. Shadows are not the enemy; shadows are what give a photograph depth, emotion, and that cinematic, artistic feel.
Step-by-Step Lighting Setup:
- Choose the Right Window: Find a large window in your home that gets indirect sunlight. You do not want harsh, bright sunbeams hitting the floor (this creates hard, unflattering shadows). North or south-facing windows are usually perfect. If the sun is beaming directly in, tape a sheer white curtain or a white bedsheet over the window to diffuse the light.
- Turn Off ALL Artificial Lights: This is a critical step that many parents miss! Turn off the overhead lights, the floor lamps, and the hallway lights. Artificial light has a yellow or orange color cast that will mix poorly with the natural window light, ruining the moody vibe and making your baby’s skin look unnatural.
- Position Your Setup: Place your nursing pillow on the floor (or a low, wide ottoman) about 2 to 3 feet away from the window.
- The 90-Degree Rule: You want the light to hit your baby from the side or slightly from the top of their head. Imagine the window is at the 12 o’clock position. Your baby’s head should be at the 9 o’clock or 3 o’clock position. The light will wash softly over their face, leaving the opposite side in beautiful, velvety shadow.
By placing the baby parallel to the window, you create a gradient of light. The side of their chubby cheek closest to the window will be brightly illuminated, while the side furthest away will gently fade into the black velvet background. This is the exact technique professional photographers charge thousands of dollars for!
Prepping Your Canvas: The Doula’s Guide to a Sleepy, Happy Baby
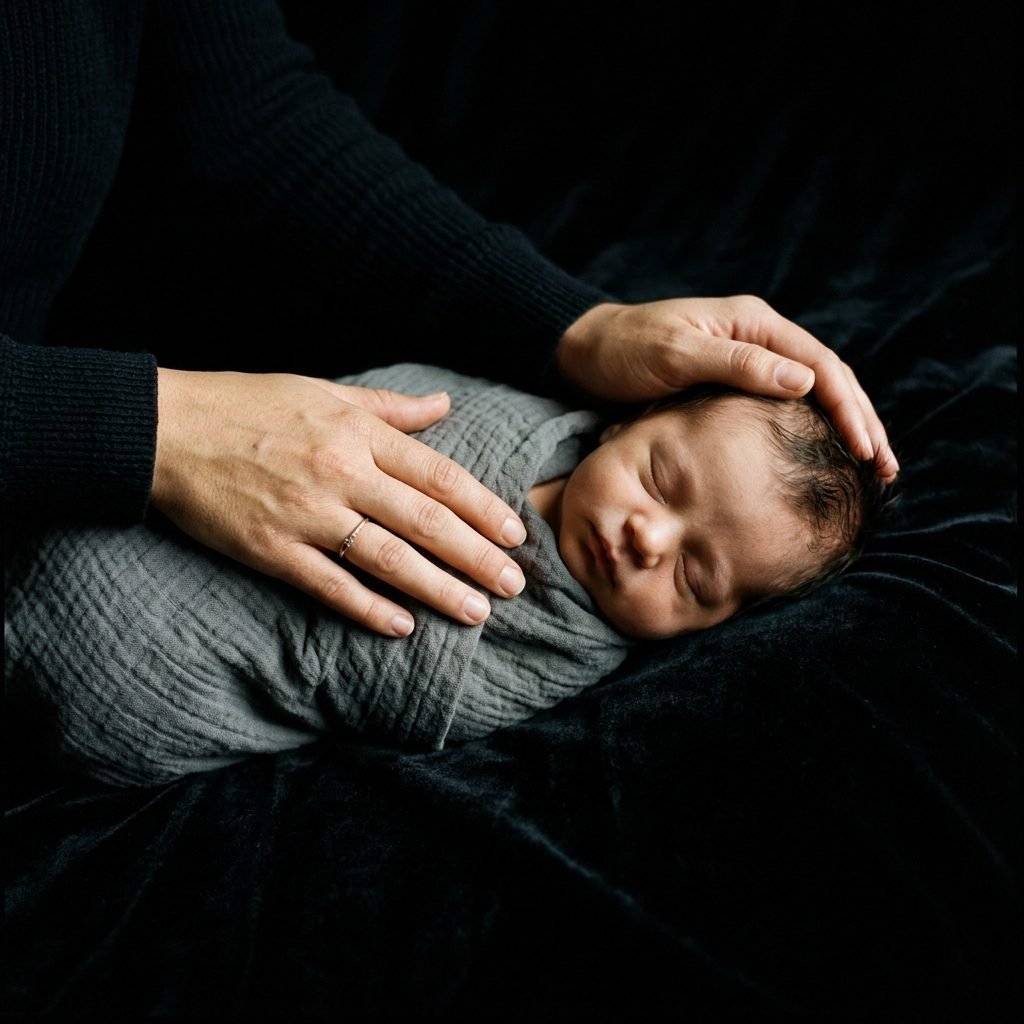
As a postpartum expert, I can promise you this: a successful newborn photoshoot has very little to do with camera settings and absolutely everything to do with baby prep. A cold, hungry, or gassy baby will not settle for photos. We want to induce what I lovingly call the “Milk Drunk Coma.” Here is exactly how to prepare your little one for a stress-free session.
The Pre-Shoot Timeline
- 60 Minutes Before: Turn on your space heater in the room where you will be shooting. Aim for a room temperature of about 78°F to 80°F. Yes, you will be sweating in your postpartum leggings, but your naked baby will feel like they are right back in the warm, cozy womb.
- 45 Minutes Before: Strip your baby down to just their diaper and wrap them snugly in a warm swaddle. It is much easier to unwrap a sleeping baby than it is to try and pull a onesie over a sleeping baby’s head later.
- 30 Minutes Before: Feed your baby a full meal. Whether you are nursing or bottle-feeding, encourage them to take a full feed. Burp them thoroughly to ensure no trapped gas wakes them up when you lay them down.
- 5 Minutes Before: Turn on your white noise machine and place it near the photography setup. Turn the volume up to resemble the sound of a strong shower running (this is how loud it was in the womb!).
Doula Tip: If your baby is going through a growth spurt or cluster feeding, do not force the photoshoot. There is always tomorrow. Follow your baby’s cues. If they are fighting sleep, wrap them up, rock them, and try again later. Your mental health and their comfort always come first.
| Baby’s Cue | What It Means | Your Action Plan |
|---|---|---|
| Rooting, sucking on hands | Hungry | Pause the shoot and offer the breast or bottle immediately. |
| Pulling legs up, grimacing | Trapped gas | Do gentle “bicycle legs” exercises or the “tiger in the tree” hold to relieve gas before posing. |
| Startle reflex (Moro reflex) | Feeling insecure/unsupported | Keep a warm hand firmly on their chest and head until they settle into the pose. |
Effortless, Baby-Led Posing for High-Contrast Shots

When it comes to posing, we are throwing out the complicated, unnatural studio poses. No “froggy” poses (which actually require Photoshop composites to be done safely), no hanging baby in a hammock. We are focusing on baby-led posing. This means we let the baby curl into the natural, womb-like positions they crave.
First, lay your black velvet fabric over the nursing pillow, ensuring it is pulled relatively taut to avoid massive wrinkles, though a few folds add beautiful texture. Gently lower your sleeping, diaper-clad baby into the center dip of the pillow. The pillow will naturally elevate their head and curve their spine, which they love.
Poses to Capture:
- The Womb Curl: Gently tuck their knees toward their tummy and cross their tiny arms over their chest. This is their natural resting state. Shoot from directly above them, focusing on their peaceful face.
- The Macro Details: Get incredibly close. The dark background will make these details pop. Take a photo entirely dedicated to their peeling toes, the swirl of hair on the crown of their head, or the way their tiny fingers curl around your adult finger.
- The Profile: Move yourself so you are shooting the baby from the side. Let the window light hit their profile, illuminating their forehead, the slope of their tiny nose, and their chin, leaving the back of their head in deep shadow. This creates a breathtaking, dramatic silhouette effect.
Safety Warning: Never leave your baby unattended on a raised surface, even a pillow on the floor, for even a second. Always keep the camera strap around your neck so it cannot accidentally slip and fall onto the baby. If you have a partner or support person nearby, have them sit inches away from the baby as a “spotter.”
Editing Magic: Bringing Out the Mood on Your Smartphone
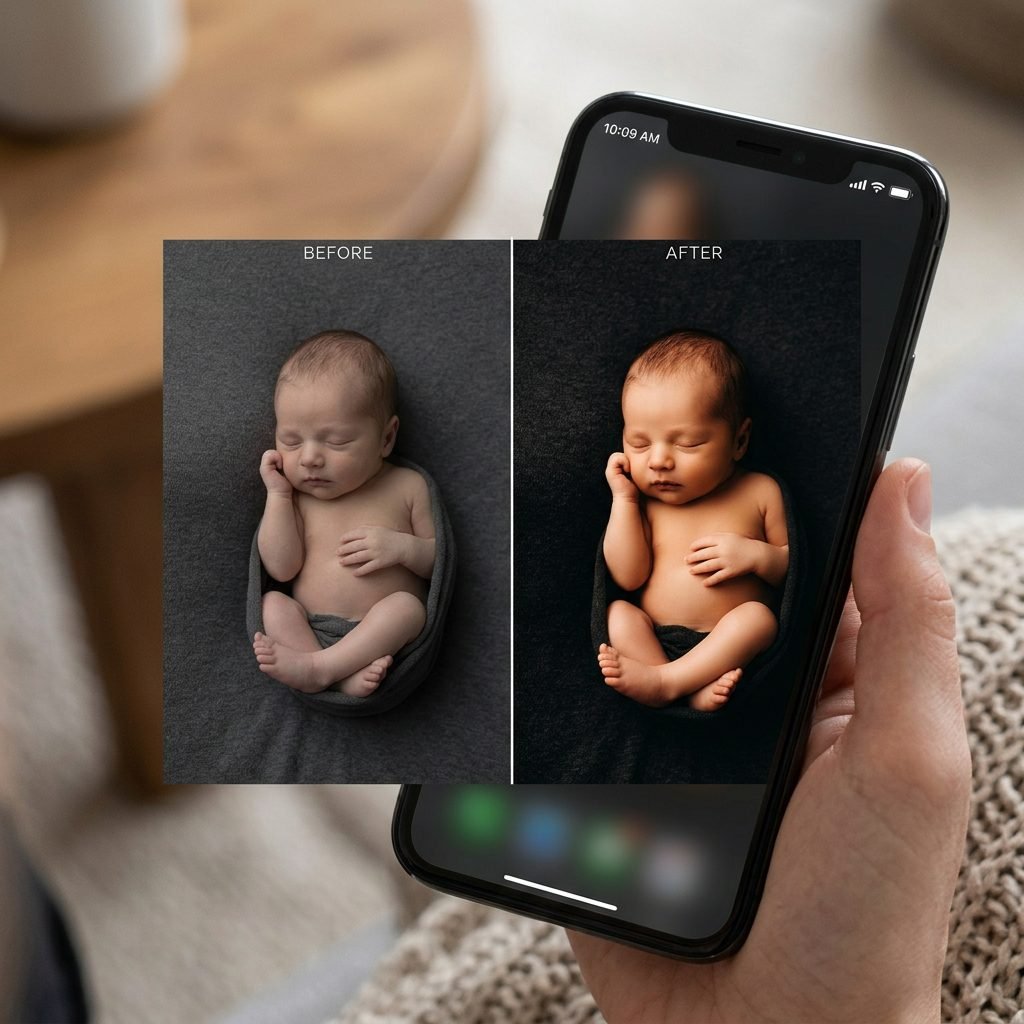
You have captured the images, and they probably look pretty good! But the true secret to the “dark and moody” aesthetic happens in the editing room. You do not need expensive software on a computer; the free Lightroom Mobile app or your phone’s native photo editor will work perfectly.
When you open your photo, it might look a little flat or too bright. Our goal is to deepen the shadows, enhance the contrast, and bring a warm, creamy tone to the baby’s skin.
| Editing Tool | Adjustment Direction | The Visual Effect |
|---|---|---|
| Exposure / Brightness | Slightly DOWN (-10 to -20) | Darkens the overall image, setting the moody tone. |
| Contrast | UP (+15 to +30) | Makes the darks darker and the lights lighter, creating that dramatic pop. |
| Shadows / Black Point | DOWN (-20 to -40) | This is the magic step! It turns the dark grey velvet into a rich, bottomless black, hiding any wrinkles or floor clutter. |
| Highlights | Slightly DOWN (-10) | Ensures the bright window light on the baby’s cheek doesn’t look blown out or overly white. |
| Warmth / Temperature | Slightly UP (towards Yellow/Orange) | Gives the baby’s skin a healthy, warm, nostalgic glow. |
Copy-Paste Editing Mantra: “Protect the highlights, crush the shadows.” Always make sure you can still see the texture in your baby’s skin. If their face looks like a glowing white orb, turn your highlights and exposure down!
Play with these sliders until the image makes your heart flutter. You can even switch the photo to Black and White for an incredibly timeless, classic portrait that focuses entirely on emotion and texture.
Conclusion
Preserving the Magic of the Fourth Trimester
Mama, as you pack up your black velvet and turn off the space heater, take a moment to breathe. You just documented one of the most fleeting, sacred chapters of your family’s life. These dark and moody portraits are more than just photographs; they are time capsules. Years from now, when your home is loud with the footsteps of a running toddler or a slamming door from a teenager, you will look at these images. You will see the velvet shadows, the milky breath, the absolute peace of your newborn, and you will be transported right back to this quiet, beautiful moment.
Remember that you do not need to be a professional to capture the profound love you have for your child. The shadows in these photos represent the quiet, unseen hours of motherhood—the midnight feedings, the gentle rocking, the silent vigilance. The light represents the overwhelming, blinding love that your baby has brought into your world. Be incredibly proud of yourself for taking the time to create this art amidst the chaos of postpartum recovery.