5 Wall-Supported Hip Opening Stretches to Prep for a Faster Labor
Hello, beautiful mama. If you have found your way here, you are likely in the thick of the third trimester, feeling the beautiful (but undeniable) heaviness of your growing baby. First of all, take a deep breath. Drop your shoulders. Unclench your jaw. You are doing monumental, miraculous work every single second of the day, even when you are just resting on the couch.
As a doula and maternal wellness specialist, one of the most common questions I hear from expectant mothers is: How can I prepare my body for a smoother, faster labor? While every birth journey is wonderfully unique and unpredictable, there is so much we can do biomechanically to invite baby into the optimal position. Enter your new best friend: the wall.
Why the wall? When you are pregnant, your center of gravity shifts dramatically, and the hormone relaxin makes your joints wonderfully loose but sometimes a little unstable. The wall acts as a sturdy, unwavering birth partner. It provides zero-cost, highly accessible support that allows you to sink deeply and safely into hip-opening stretches without fearing a loss of balance. By utilizing wall-supported stretches, we can actively create space in the pelvic inlet, midpelvis, and outlet, encouraging your baby to drop, rotate, and engage perfectly for delivery.
In this guide, we are going to walk through five evidence-based, deeply comforting wall stretches. Grab a cozy yoga mat, slip into your favorite stretchy maternity leggings, and let us prepare your beautiful body for the miraculous marathon of birth.
Understanding the Magic of Pelvic Biomechanics for Labor

Before we dive into the physical movements, let us talk about the why. Your pelvis is not just a static bowl of bone; it is a dynamic, moving structure made of ligaments, joints, and muscles that can expand, shift, and open. To help your baby navigate their way into the world, they must pass through three distinct levels of the pelvis: the inlet (the top), the midpelvis (the middle), and the outlet (the bottom).
Different stretches target different levels of the pelvis. For example, external rotation of the femurs (like in a butterfly stretch) opens the top of the pelvis, while internal rotation (knees in, ankles out) opens the bottom. By using the wall, we can safely isolate these areas and stretch the surrounding musculature—like the psoas, piriformis, and glutes—which often become tight and cramped from carrying the weight of pregnancy.
Position vs. Labor Phase Matrix
To help you understand how these stretches not only prepare you for labor but can actually be used during labor, I have created a quick reference guide. You can absolutely use these positions when you are actively contracting to help bring your baby down!
| Stretch / Position | Pelvic Level Opened | Best Used During… |
|---|---|---|
| Wall-Assisted Deep Squat | Pelvic Outlet (Bottom) | Pushing phase, descending baby in late active labor |
| Wall Figure-Four | Glutes & Piriformis | Early labor, resting between contractions, sciatica relief |
| Standing Wall Lunges | Midpelvis (Asymmetrical) | Active labor, helping baby rotate if stalled |
| Wall-Supported Butterfly | Pelvic Inlet (Top) | Early labor, helping baby engage into the pelvis |
| Supported Forward Fold | Lower Back & Hamstrings | Throughout labor for back pain relief and resting |
Keep this chart in mind as we move through our routine. Knowledge is power, mama, and understanding your body’s mechanics is the first step toward an empowered birth experience.
Stretch 1: The Wall-Assisted Deep Squat (Malasana)
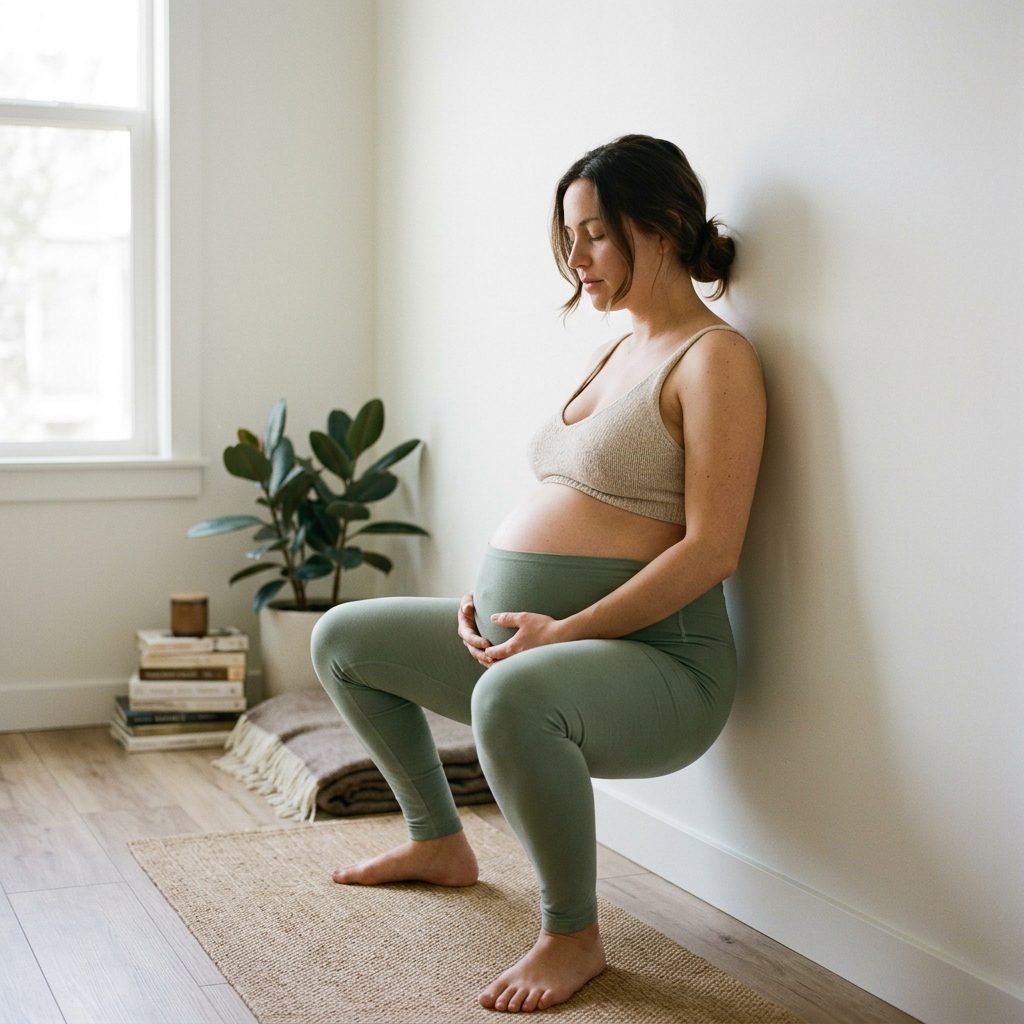
The deep squat is often hailed as the holy grail of birth preparation, and for good reason. Squatting can increase the diameter of your pelvic outlet by up to 30 percent! However, a freestanding deep squat in the third trimester can feel incredibly daunting and hard on the knees. Using the wall allows you to reap all the pelvic-opening benefits while keeping your spine supported and your balance secure.
How to Perform the Wall-Assisted Deep Squat:
- Stand with your back flat against a sturdy wall, keeping your feet slightly wider than hip-width apart.
- Turn your toes slightly outward, at about a 45-degree angle.
- Walk your feet about a foot and a half away from the wall, leaning your weight fully into the wall.
- Take a deep breath in. As you exhale, slowly slide your back down the wall, bending your knees.
- Lower yourself only as far as feels comfortable. If you can, drop your hips below your knees into a full squat. If not, a half-squat is perfectly fine!
- Bring your hands to your heart center, or rest them gently on your beautiful belly.
- Hold for 5 to 10 deep breaths, focusing on softening your pelvic floor with every exhale.
- To come up, press your hands against the wall or your thighs, and slowly slide back up to a standing position.
“I open, I soften, I release. My body knows exactly what to do.”
Doula Pro-Tip: If your heels pop up off the floor, place a rolled-up yoga mat or a firm towel under your heels for support. Never force the stretch. If you feel any sharp pain or if your baby is currently breech (after 34 weeks), consult your care provider before doing deep squats.
Stretch 2: Wall Figure-Four Stretch for Sciatica Relief
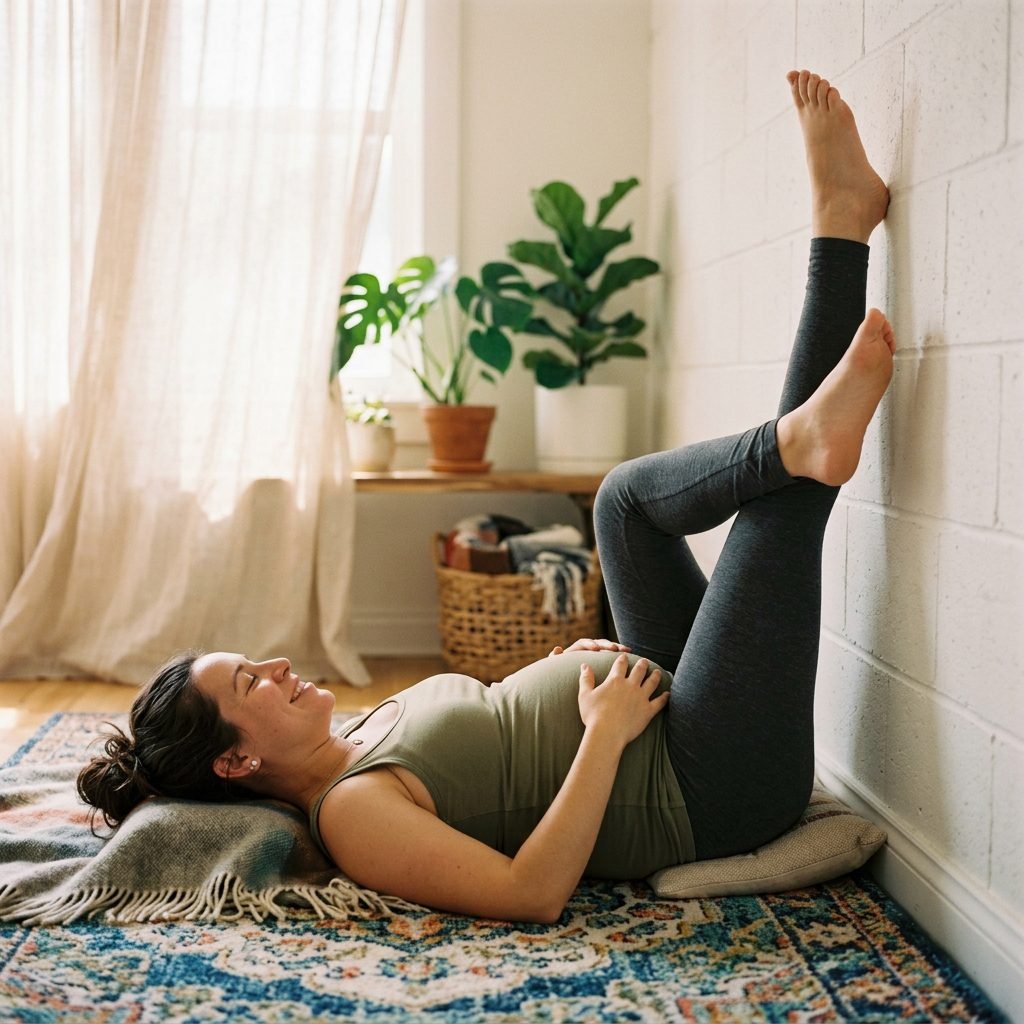
Oh, the dreaded pregnancy sciatica and lightning crotch! As your baby grows, the pressure on your sciatic nerve and the tightness in your piriformis muscle can cause sharp, shooting pains down your legs or deep in your glutes. The Wall Figure-Four stretch is a restorative, gravity-assisted miracle worker that targets these exact areas without requiring you to balance or strain.
How to Perform the Wall Figure-Four:
- Lie on your back on a comfortable yoga mat or rug, scooting your hips close to the wall. (To get into this position safely, lie on your side first, then roll onto your back while swinging your legs up the wall).
- Extend both legs straight up the wall. Your body should form a soft “L” shape.
- Bend your right knee and place your right ankle across your left thigh, just below the knee, creating a “figure four” shape.
- Slowly begin to bend your left knee, sliding your left foot down the wall. As your left foot comes closer to the floor, you will feel a deep, delicious stretch in your right glute and hip.
- Stop sliding when you feel a strong but comfortable stretch. Do not push into pain.
- Hold this position for 2 to 3 minutes. Breathe deeply into your belly, sending oxygen to the tight muscles in your hips.
- Slowly straighten the left leg back up the wall, uncross the right leg, and switch sides.
Important Comfort Note: Because you are lying on your back, you must be mindful of how you feel. If you experience any dizziness, shortness of breath, or nausea (signs of supine hypotensive syndrome), immediately roll onto your left side. You can always place a wedge pillow under your right hip to tilt your pelvis slightly and keep the weight off your vena cava.
Stretch 3: Standing Wall Lunges for Asymmetrical Opening
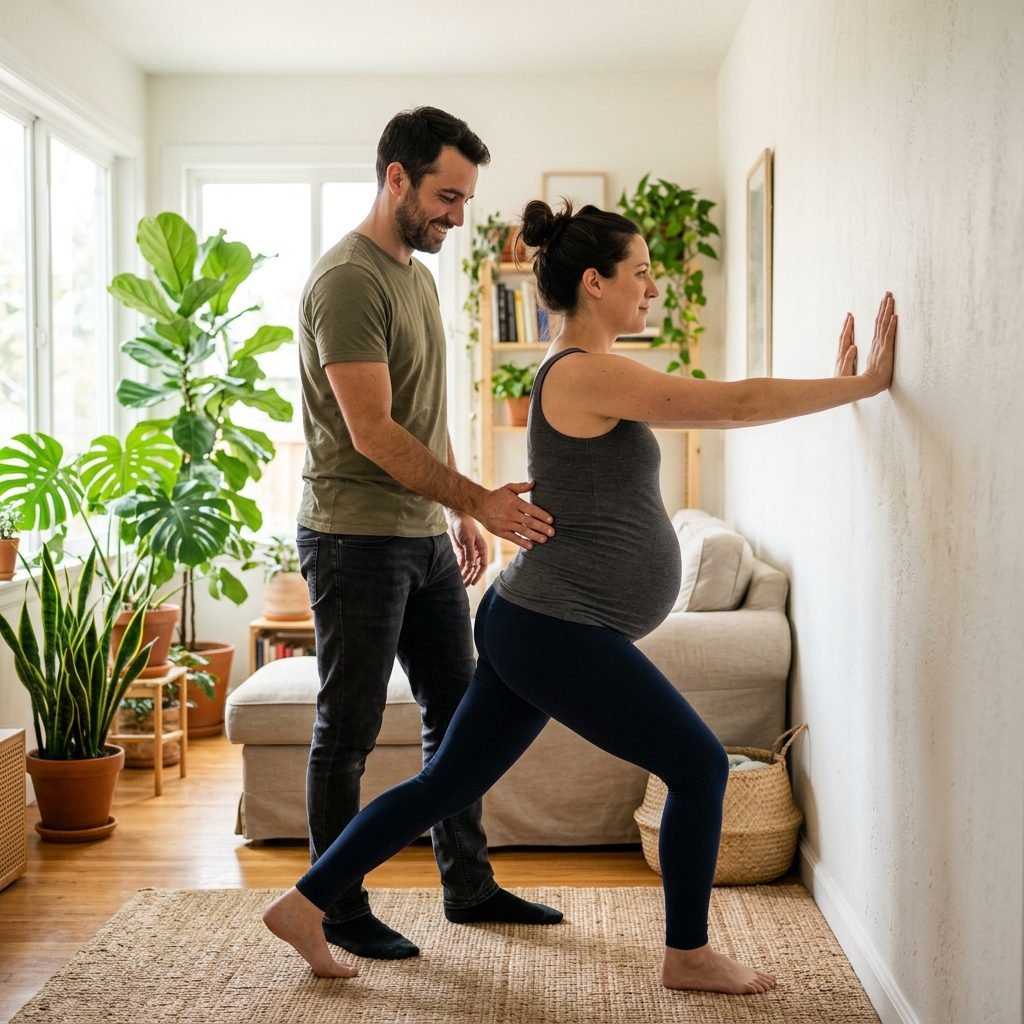
When we talk about optimal fetal positioning, we cannot ignore the power of asymmetrical movements. Symmetrical stretches (like squats) open the pelvis evenly, but asymmetrical stretches (where one leg is doing something different than the other) actually shift the pelvic bones in a way that creates a diagonal opening. This is incredibly helpful if your baby is slightly asynclitic (their head is tilted) or if labor has stalled. Standing wall lunges provide this magical asymmetry with the perfect amount of support.
How to Perform Standing Wall Lunges:
- Stand facing the wall, about an arm’s length away. Place both hands flat on the wall at shoulder height.
- Step your right foot forward so your toes are almost touching the wall.
- Step your left foot back about two to three feet, keeping the left leg straight and the left heel pressing toward the floor.
- Slowly bend your right knee, lunging forward toward the wall. Keep your chest lifted and your arms strong.
- You should feel a deep stretch in the front of your left hip (your hip flexors) and your left calf.
- Hold for 30 to 60 seconds, taking long, rhythmic breaths. Focus on relaxing your jaw—remember the connection between the jaw and the pelvic floor!
- Push off the wall gently to return to the starting position, and switch legs.
“Every breath I take brings my baby closer to my arms. My pelvis is open and spacious.”
Partner Integration: This is a wonderful stretch to practice with your birth partner. Instead of using the wall, you can place your hands on your partner’s shoulders while they hold your waist. During labor, lunging through a contraction while leaning on your partner or the wall can significantly speed up dilation and help baby rotate!
Stretch 4: Wall-Supported Butterfly (Baddha Konasana)
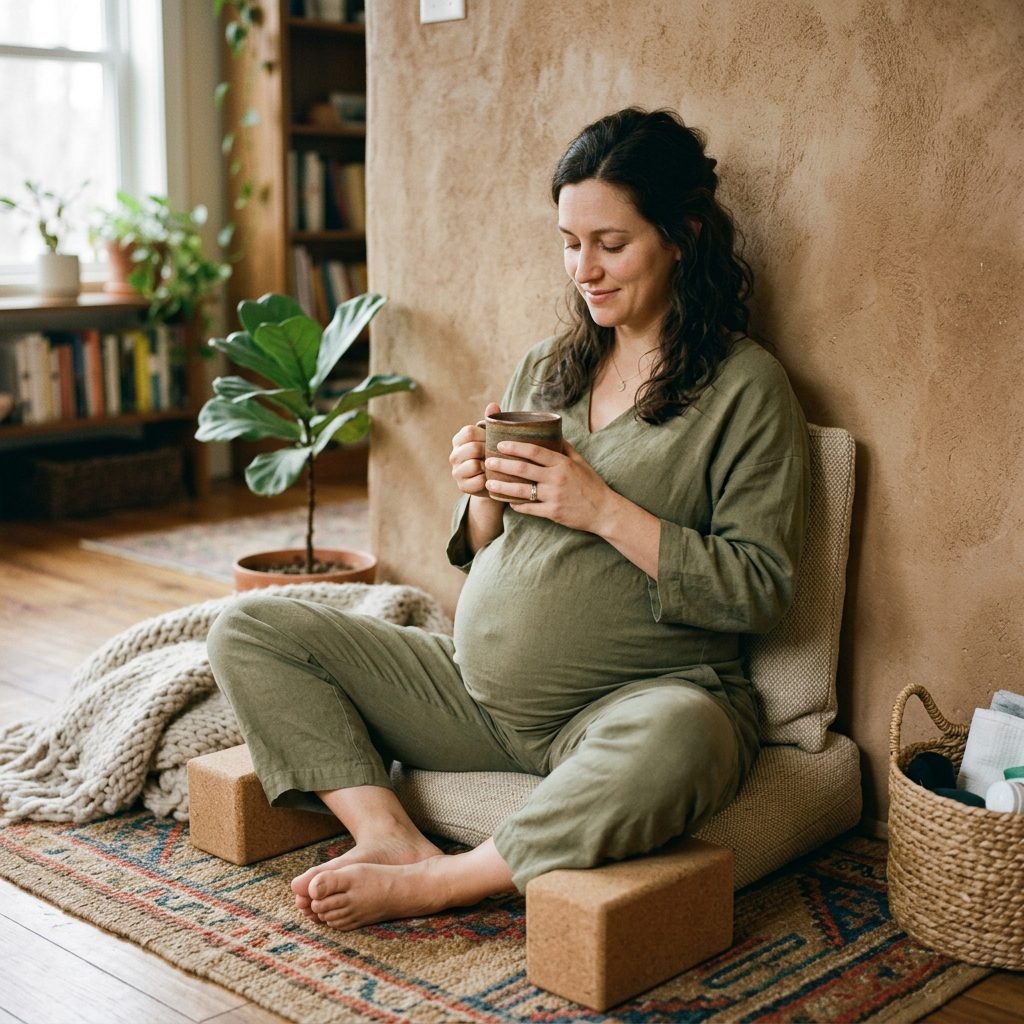
The Butterfly stretch is a classic, but doing it with wall support elevates it to a deeply restorative practice. When you sit unsupported, your core and back muscles have to work hard to keep you upright, which can cause tension. By bringing your spine flush against the wall, your upper body can completely surrender, allowing your inner thighs and the pelvic inlet to fully release and open. This is a beautiful position to practice mindfulness, visualization, and hypnobirthing tracks.
How to Perform the Wall-Supported Butterfly:
- Sit on the floor with your back, shoulders, and head resting flat against the wall. If your lower back feels strained, sit on a folded blanket or a firm meditation cushion to elevate your hips.
- Bring the soles of your feet together, allowing your knees to drop open to the sides.
- Draw your heels as close to your pelvis as feels comfortable. Do not force them; your comfort is the priority.
- If your knees are floating high off the ground and you feel pulling in your groin, place a yoga block or a firm pillow under each knee for support. Support creates safety, and safety allows muscles to release.
- Rest your hands palms-up on your knees, or cradle the underside of your belly.
- Close your eyes and practice your labor breathing: Inhale deeply through your nose for a count of 4, and exhale slowly through your mouth for a count of 6.
- Stay in this position for 3 to 5 minutes.
Doula Pro-Tip: Visualize your pelvic inlet opening like a blooming lotus flower. This is a fantastic stretch to do in the evenings while winding down, listening to a calming playlist, or chatting with your partner about your birth preferences.
Stretch 5: The Supported Wide-Legged Forward Fold
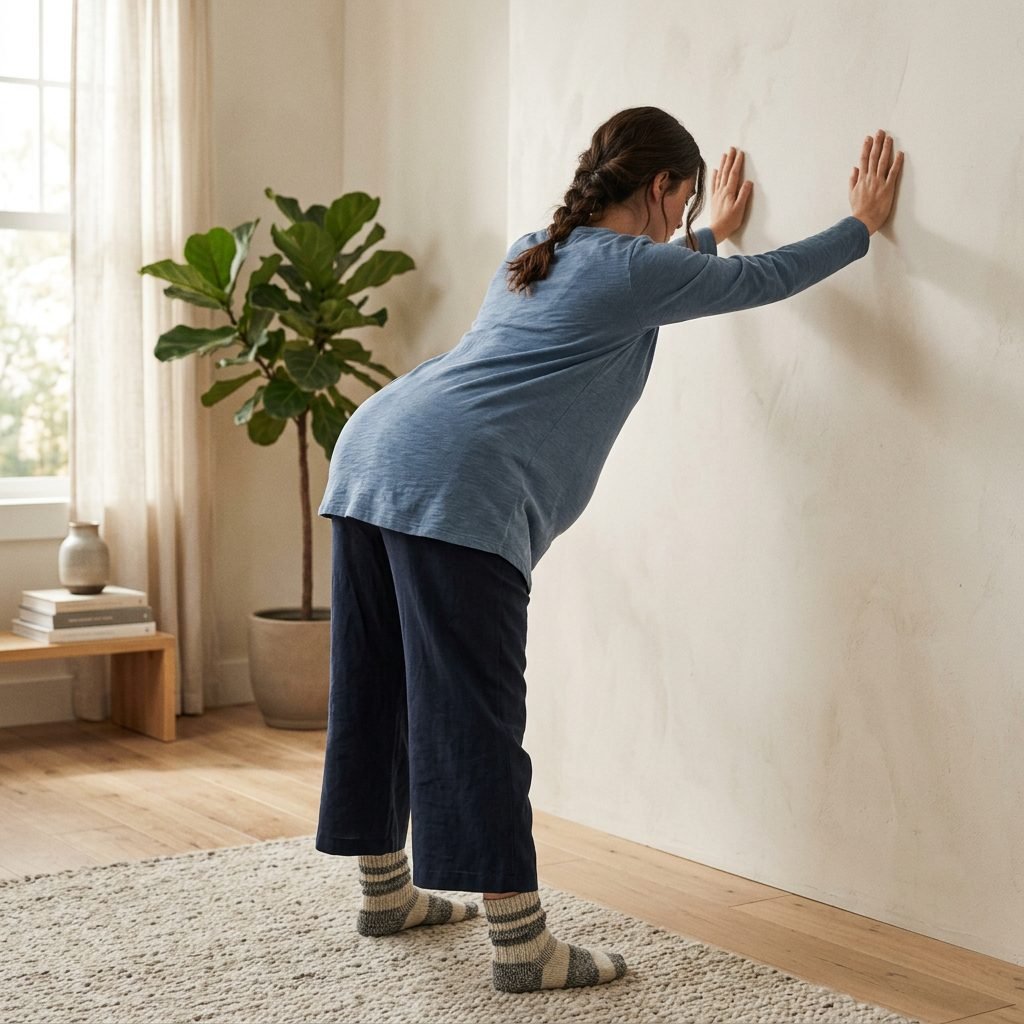
As pregnancy progresses, the lower back takes on a tremendous amount of strain, often leading to deep, aching discomfort. The Supported Wide-Legged Forward Fold is a dual-action powerhouse: it stretches the hamstrings and lower back while simultaneously opening the back of the pelvis. This stretch feels like a massive sigh of relief for a tired, heavy body. Using the wall ensures you do not overstretch your hamstrings, which are more vulnerable due to relaxin.
How to Perform the Supported Forward Fold:
- Stand facing the wall, about two to three feet away.
- Step your feet wide apart—wider than your hips, giving your belly plenty of room. Turn your toes slightly inward or keep them parallel.
- Place your hands on the wall at hip height.
- Slowly walk your feet back while hinging at your hips, keeping your back completely flat and straight. Your body should eventually form a 90-degree right angle.
- Let your head drop softly between your arms, keeping your neck long and relaxed.
- Press your palms actively into the wall while pushing your hips back away from the wall. You will feel a glorious traction in your spine and a stretch down the backs of your legs.
- Hold for 5 to 8 deep breaths. With every exhale, imagine the tension melting out of your lower back and dripping down into the floor.
- To come out of the stretch, slowly walk your feet toward the wall, bend your knees slightly, and walk your hands up the wall until you are standing upright.
“I release the weight of the day. My back is strong, my pelvis is wide, my baby is safe.”
Labor Application: This “right-angle” position is exceptional during active labor. Leaning over a hospital bed, a window sill, or a wall during a contraction takes the pressure off your cervix and lower back, providing natural pain relief while allowing gravity to do its work.
Building Your Daily Labor Prep Routine
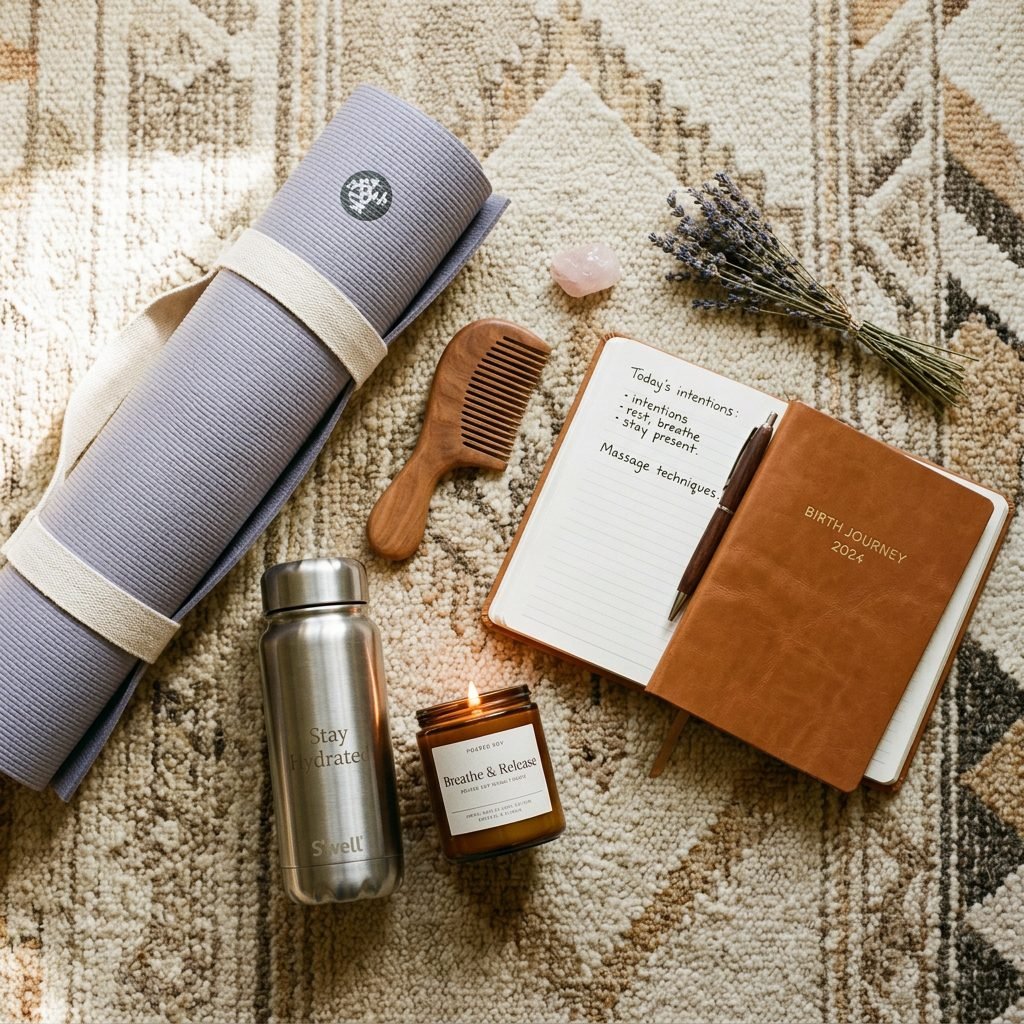
Consistency is key when it comes to preparing your body for birth. You do not need to spend hours a day stretching; in fact, just 10 to 15 minutes of intentional, mindful movement can make a world of difference. I recommend incorporating these five wall-supported stretches into your evening wind-down routine starting around 32 weeks (or earlier, if cleared by your provider).
- Hydrate: Always drink a large glass of water before and after stretching. The amniotic fluid needs constant replenishment, and hydrated muscles stretch more easily.
- Set the Mood: Dim the lights, light a pregnancy-safe beeswax candle, and play your birth playlist. Conditioning your brain to relax to these cues now will help you drop into the “labor zone” much faster on your birthing day.
- Listen to Your Body: If a stretch feels wrong, pinching, or painful, stop immediately. Your body’s intuition is your greatest guide.
Mama, as you practice these stretches, remember that you are not just stretching muscles—you are making physical and energetic space for your baby. You are strong, you are capable, and your body was brilliantly designed for this exact journey. Trust the process, lean on your support systems (and your walls!), and know that every deep breath brings you one step closer to holding your sweet baby in your arms.
Conclusion
Preparing for labor is as much a mental journey as it is a physical one. By utilizing these 5 wall-supported hip opening stretches, you are actively participating in your birth preparation, encouraging optimal fetal positioning, and giving your hard-working body the grace and relief it deserves. Remember to be gentle with yourself. Take it one breath, one stretch, and one day at a time. You are doing beautifully, sister.