The Side-to-Side Rocking Burping Method to Get Big Burps Out of Stubborn Babies
The 3:00 AM Struggle: When the Burp Just Won’t Come
Oh, sweet mama, I see you. It is the middle of the night, your eyes are heavy, and you’ve been patting your little one’s back for what feels like an eternity. You can hear that tiny tummy rumbling, and you know there is a giant air bubble trapped in there causing discomfort, but no matter how much you pat or rub, nothing is happening. Your baby is squirming, maybe even arching their back, and you’re both exhausted. As a doula, I’ve spent countless nights in those quiet trenches with families, and I want to tell you something important: you aren’t doing anything wrong. Some babies are simply ‘stubborn burpers’ because of their unique anatomy or the way they swallow air during a feed.
Standard over-the-shoulder burping works for many, but for the babies we call ‘the gassy warriors,’ we need something a bit more strategic. Enter the Side-to-Side Rocking Burping Method. This isn’t just about force; it’s about physics and gentle movement. By shifting the baby’s torso, we help that air bubble navigate the curves of the esophagus until it finds its way out. In this guide, I’m going to walk you through exactly how to master this move so you can get those big, satisfying burps out and get both you and your baby back to sleep.
Understanding the ‘Stubborn’ Burper: Why Traditional Patting Fails
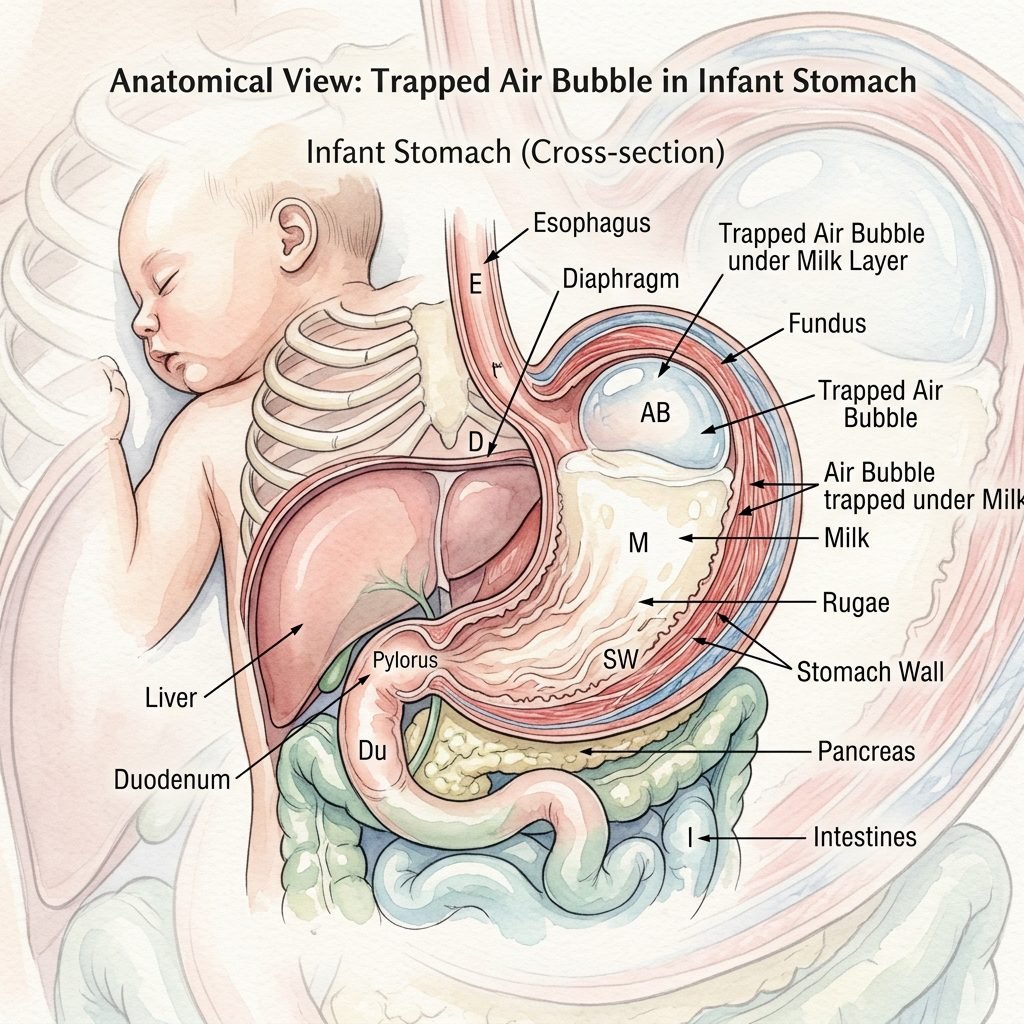
Before we dive into the technique, let’s talk about why your baby might be holding onto that gas. A newborn’s digestive system is incredibly immature. The valve at the top of the stomach—the lower esophageal sphincter—is often quite loose, while the stomach itself is small and horizontal. When air gets trapped underneath a layer of milk, a simple pat on the back often just compresses the air further down rather than coaxing it up.
Common Reasons for Trapped Gas
- Fast Let-Down: If your milk comes in quickly, baby might gulp to keep up, swallowing air in the process.
- Bottle Angle: If the bottle isn’t angled enough, the nipple may fill with air.
- Immature Digestion: Sometimes, the ‘pipes’ are just learning how to move things along.
The Side-to-Side Rocking Method works because it uses gravity and gentle compression to ‘swirl’ the stomach contents, allowing the air to rise to the top of the ‘milk line’ where it can be easily expelled.
“Remember, mama: a gassy baby isn’t a reflection of your care. It’s just a tiny body learning how to work. Take a deep breath; we will get that bubble out together.”
Step-by-Step: Mastering the Side-to-Side Rocking Move

This method is best performed while you are seated comfortably in a chair with your feet flat on the floor. It focuses on moving the baby’s torso in a way that creates a ‘pathway’ for the air. Follow these steps carefully:
- The Lap Position: Sit your baby upright on your lap, facing away from you or sideways. Place one hand firmly under their chin to support the jaw (be careful not to put pressure on the throat!) and the palm of that same hand against their chest.
- The Back Support: Place your other hand on their lower back to provide stability.
- The Lean: Gently lean your baby forward slightly so their weight is supported by your hand on their chest. This applies light pressure to the tummy.
- The Side-to-Side Motion: Slowly and smoothly, rotate your baby’s upper body in a side-to-side rocking motion. Think of it like a slow, rhythmic ‘sway.’ You are essentially ‘massaging’ the internal organs against the air bubble.
- The Pause: Every 10 to 15 seconds, stop the rocking and give 3 firm pats to the middle of the back, followed by a long upward stroke.
Pro Tip: Keep the movements fluid. If the baby is stiff, try singing a low, humming song to help their muscles relax. A relaxed baby burps much easier than a tense one!
Why This Method Wins: Comparing Burping Techniques
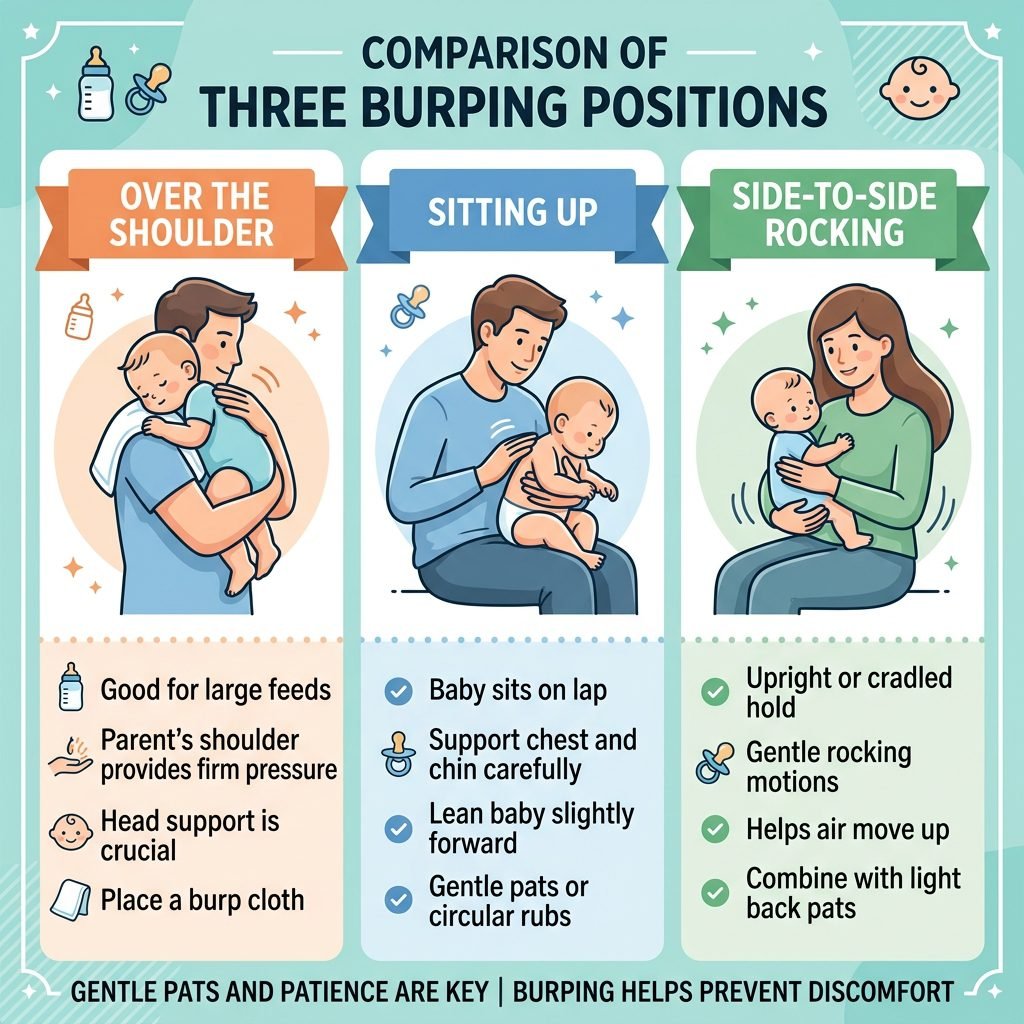
Not all burping positions are created equal, especially when you’re dealing with a ‘stubborn’ case. While the over-the-shoulder method is a classic, it doesn’t always provide the necessary abdominal compression that the Side-to-Side Rocking Method offers.
| Method | Best For… | Success Rate with ‘Stubborn’ Gas |
|---|---|---|
| Over-the-Shoulder | Sleepy babies, light burpers | Low |
| Sitting Upright | Reflux babies, active feeders | Medium |
| Side-to-Side Rocking | Trapped gas, ‘stubborn’ burpers, colicky infants | High |
| Face-Down (Lap) | Deep gas, late-night fussy spells | High |
The Side-to-Side method is particularly effective because it combines positional changes with kinetic energy. By moving the baby, you are physically shifting the air bubble, preventing it from getting ‘stuck’ in the folds of the stomach lining.
When the Rocking Isn’t Enough: The ‘Magic Combo’ Routine

Sometimes, even the best rocking needs a little extra help. If you’ve been rocking for 5 minutes and still haven’t heard that sweet sound of relief, try the ‘Magic Combo’ routine. This is a sequence I teach all my postpartum clients to help move gas through the entire digestive tract.
The 3-Step Relief Sequence
- Step 1: Bicycle Legs. Lay baby on their back and gently cycle their legs toward their tummy. This helps move gas in the lower intestines.
- Step 2: The Tummy Rub. Use two fingers to rub in a clockwise circle around the belly button.
- Step 3: Return to Rocking. Pick the baby back up and resume the Side-to-Side Rocking Method. Often, the movement from lying down to sitting back up is exactly what the air bubble needs to break free.
Note: If your baby is crying hysterically, they are swallowing more air. Try to soothe them with a pacifier or a ‘shushing’ sound for 2 minutes before attempting to burp again. A calm baby is a burping baby.
Troubleshooting Common Burping Mistakes

Even with the best intentions, a few small mistakes can make burping harder than it needs to be. Let’s look at what to avoid to ensure you’re getting those ‘big’ burps every time.
| What to Avoid | Why It Matters | The Better Way |
|---|---|---|
| Patting too low | The stomach is higher than you think! | Pat between the shoulder blades. |
| Cupped hands | Can be too loud and startling. | Use a flat, firm palm for a solid ‘thud.’ |
| Giving up too soon | Air bubbles can take 10-15 minutes to move. | Switch positions every 3-5 minutes. |
| Tight clothing | Restricts the expansion of the abdomen. | Loosen the diaper or onesie before burping. |
Always remember to keep a burp cloth (or three!) handy. The Side-to-Side method can sometimes bring up a little ‘happy spit-up’ along with the air, and that is perfectly normal. It just means the pressure is working!
Conclusion
You’ve Got This, Mama
Burping a stubborn baby can feel like a marathon, especially when you’re running on very little sleep. But the Side-to-Side Rocking Method is a powerful tool in your mothering toolkit. It’s gentle, it’s effective, and it fosters a deep sense of connection between you and your little one. By understanding the physics of their tiny bodies and responding with patient, rhythmic movement, you are providing the comfort they need to thrive.
Next time you feel that frustration rising, take a deep breath, settle into your chair, and start that gentle sway. That big burp is coming, and with it, a much-needed stretch of sleep for both of you. You are doing an incredible job, one bubble at a time.