
The Harvest Hack: How To Hand Express And Store Colostrum Before Baby Arrives
As you enter the final weeks of your pregnancy, the nesting instinct is likely in full force. You’re washing tiny clothes, assembling nursery furniture, and packing your hospital bag. But what if there was one more powerful, proactive step you could take to prepare for your baby’s arrival? Something that could provide an incredible health boost and peace of mind? Welcome to the world of antenatal colostrum harvesting.
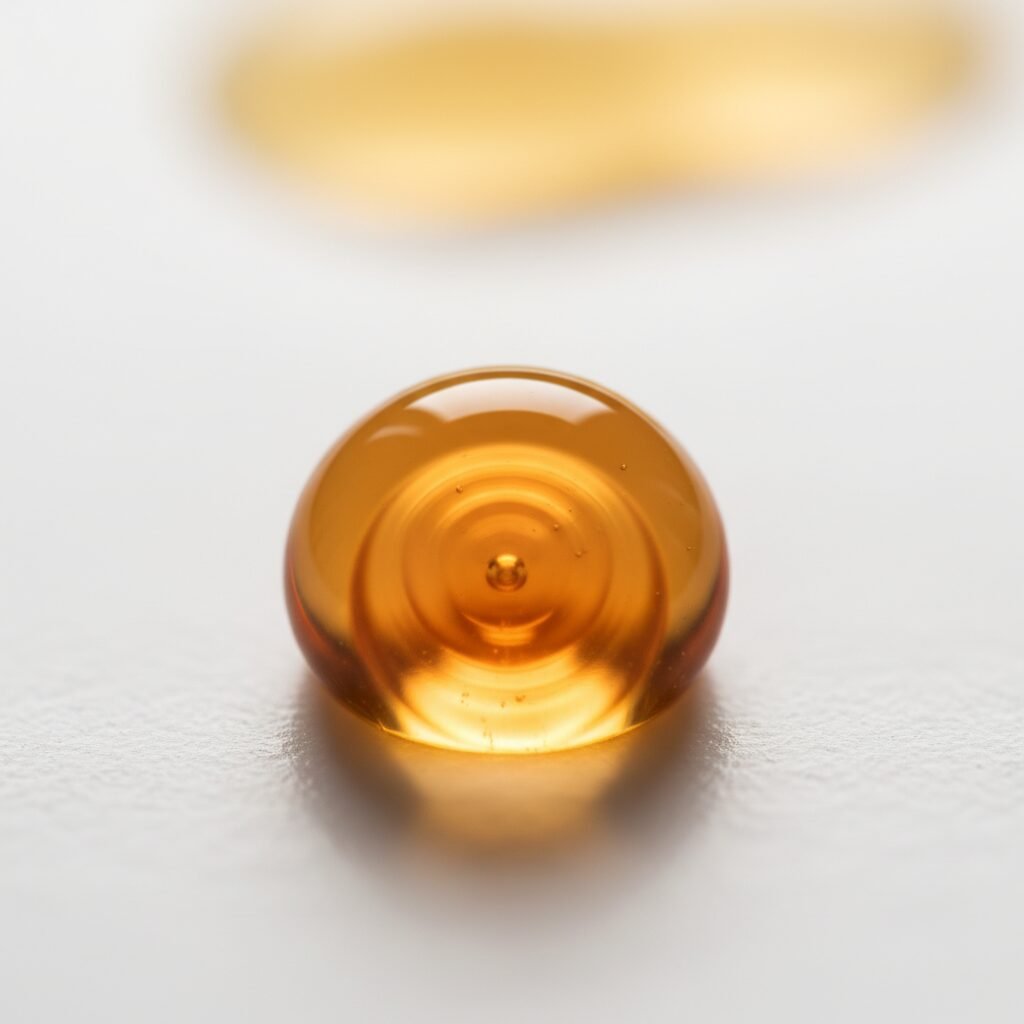
Often referred to as ‘liquid gold,’ colostrum is the first milk your body produces, and it’s a veritable superfood for your newborn. The practice of collecting this precious fluid before your baby is born is becoming increasingly common, empowering parents to have a supply on hand for those crucial first hours and days. This guide, written from my experience as a Doula and Maternal Health Educator, will walk you through everything you need to know. We’ll explore the ‘why,’ the ‘when,’ and most importantly, the safe and effective ‘how’ of hand expressing and storing your colostrum.
Understanding Colostrum: Your Baby’s First Superfood
Understanding Colostrum: Your Baby’s First Superfood
Before we delve into the technique, it’s essential to understand what makes colostrum so special. It’s not just early milk; it’s a complex, living substance perfectly designed by your body for your newborn’s specific needs. Your body may begin producing it as early as the second trimester, and it is the primary fuel for your baby for the first 2-5 days after birth, before your mature milk comes in.
Colostrum is thicker and more yellow than mature milk, and it’s densely packed with everything a new baby needs:
- Immunoglobulins: It’s rich in antibodies, particularly Secretory IgA, which coats your baby’s intestines, creating a protective barrier against germs and allergens. It’s your baby’s first, natural immunization.
- High Protein, Low Fat: This composition is easy for a newborn’s immature digestive system to handle. It provides concentrated nutrition in small, manageable doses.
- Laxative Effect: Colostrum helps your baby pass meconium, the dark, tarry first stool. This process is crucial for clearing out bilirubin and helping to prevent jaundice.
- Blood Sugar Regulation: The unique blend of proteins and carbohydrates helps stabilize your baby’s blood sugar levels, which is particularly important for babies who are large or small for their gestational age, or whose mothers have diabetes.
To truly appreciate its potency, let’s compare it to mature breast milk.
| Component | Colostrum (Per 100ml) | Mature Milk (Per 100ml) |
|---|---|---|
| Energy (kcal) | ~58 | ~70 |
| Protein (g) | ~2.3g (High) | ~1.1g |
| Fat (g) | ~2.9g (Lower) | ~4.2g |
| Carbohydrates (Lactose, g) | ~5.3g | ~7g |
| Secretory IgA (Antibodies) | Extremely High | Present, but in lower concentrations |
As you can see, while mature milk is higher in fat and calories for a growing baby, colostrum is a low-volume, high-impact substance designed for protection and system regulation. A newborn’s stomach is only the size of a cherry on day one, so the small, concentrated amounts you can express are a perfect match for their needs.
The ‘Why’: Key Benefits of Collecting Colostrum Before Birth

The ‘Why’: Key Benefits of Collecting Colostrum Before Birth
Harvesting colostrum isn’t just a trend; it’s a practice rooted in tangible benefits for both baby and the birthing parent. Having a small supply ready can reduce stress and provide a critical safety net in various situations.
Benefits for Your Baby:
- Immediate Nutrition: If there’s a delay in the first feeding due to medical reasons (e.g., a C-section or baby needing NICU care), your expressed colostrum can be given immediately, ensuring they receive its benefits without delay.
- Blood Sugar Stability: It’s a key intervention for babies at risk of hypoglycemia (low blood sugar). A few drops of colostrum can help stabilize their levels and potentially avoid the need for formula supplementation or IV glucose.
- Supports Babies with Feeding Challenges: For babies with a cleft lip or palate, Down syndrome, or other conditions that might make latching difficult, having syringe-fed colostrum ensures they are well-fed while you both learn the mechanics of breastfeeding.
- Avoids Unnecessary Formula: For parents who are committed to exclusive breastfeeding, having a colostrum supply can be a bridge for any early feeding challenges, avoiding the introduction of formula unless medically necessary.
Benefits for You, the Parent:
- Builds Confidence: The process demystifies your body and breastfeeding. Successfully expressing even a few drops can be incredibly empowering and builds confidence in your body’s ability to produce milk.
- Practice Makes Perfect: You will learn the invaluable skill of hand expression in a low-pressure environment. This is a tool you can use throughout your breastfeeding journey to relieve engorgement, clear clogged ducts, or express milk if you’re ever without a pump.
- Potential to Boost Supply: The gentle stimulation of hand expression in late pregnancy can encourage milk-making receptors in the breast, potentially leading to your mature milk coming in a little sooner after birth.
Remember, the goal isn’t to collect pints of milk. It’s about creating a small, precious reserve. Every single drop you collect is a victory and a gift to your baby.
Safety First: Is Antenatal Expression Right for You?

Safety First: Is Antenatal Expression Right for You?
While colostrum harvesting is safe for most low-risk pregnancies, it is not suitable for everyone. Your safety and the safety of your baby are paramount. Therefore, it is absolutely critical that you discuss this with your healthcare provider (OB-GYN or Midwife) before you begin.
When Can You Start?
The generally accepted time to begin antenatal expression is around 36-37 weeks of pregnancy. Starting earlier can, in some cases, stimulate uterine contractions, which is why waiting until you are full-term is the standard recommendation. Your provider will give you the green light based on your personal health history.
Who Should Avoid Antenatal Expression?
Your healthcare provider will likely advise against antenatal expressing if you have a history of or are currently experiencing:
- Threatened or actual preterm labor in this or a previous pregnancy.
- A shortened cervix or have a cervical stitch (cerclage) in place.
- Placenta previa (where the placenta is covering the cervix).
- Vaginal bleeding in the second half of pregnancy.
- A multiple pregnancy (twins, triplets), as this carries a higher risk of preterm labor.
This is not an exhaustive list. Only your trusted medical provider can assess your individual circumstances and give you personalized advice. Once you have their approval, you can proceed with confidence.
The ‘How-To’: Your Step-by-Step Guide to Hand Expression
The ‘How-To’: Your Step-by-Step Guide to Hand Expression
This is the practical part. Find a time when you are relaxed and won’t be disturbed. For many, after a warm bath or shower is ideal, as the heat can help with milk flow. Remember to be patient and gentle with yourself. It’s a skill that takes practice.
Step 1: Preparation is Key
- Wash Your Hands: Begin by washing your hands thoroughly with soap and water for at least 20 seconds.
- Get Comfortable: Find a quiet, comfortable, and warm place to sit. Lean forward slightly to let gravity assist you.
- Gather Your Supplies: Have your sterile collection kit ready. This typically includes a small, clean cup or bowl to express into, and 1ml oral syringes to collect the droplets.
- Encourage Let-Down: Gently massage all areas of your breast for a few minutes. You can use your fingertips to stroke from your chest wall towards the nipple. Applying a warm compress to your breasts for a few minutes can also be very helpful. Thinking about your baby, looking at ultrasound pictures, or listening to calming music can also help stimulate the hormone oxytocin, which is responsible for the let-down reflex.
Step 2: The Hand Expression Technique
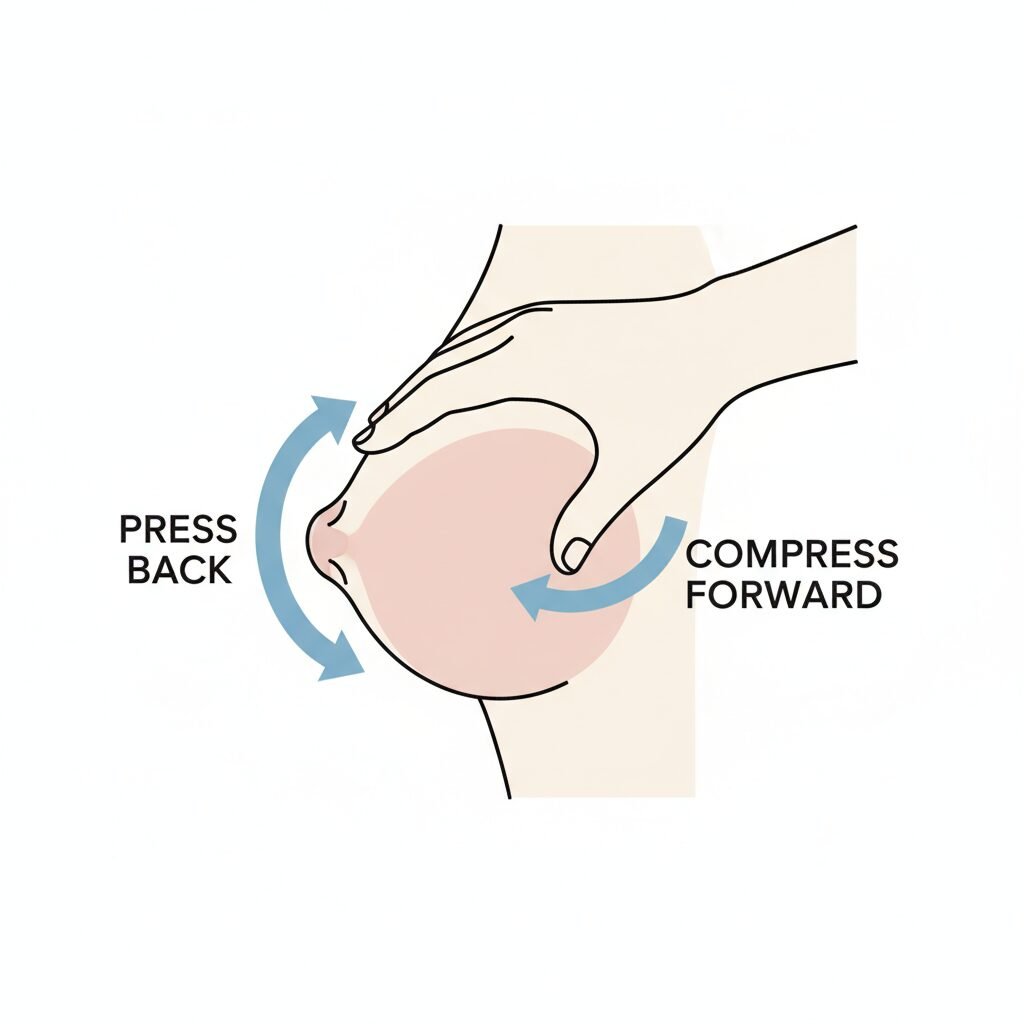
- Make a ‘C’ Shape: Cup your breast with your hand, forming a ‘C’ shape with your thumb and index finger. Place them about 1-1.5 inches behind the nipple, on the edge of the areola. Your hand position should be comfortable; you shouldn’t have to strain.
- Press Back: Gently press your thumb and finger straight back into your chest wall. Don’t press so hard that it hurts.
- Compress and Roll: Without sliding your fingers along the skin, compress your breast by bringing your thumb and finger together in a rhythmic rolling motion. This action squeezes the milk ducts that lie beneath your fingers.
- Release and Repeat: Release the pressure and repeat the ‘press, compress, roll’ sequence to establish a rhythm. It may take a few minutes before you see the first drops appear. This is completely normal.
- Collect the Drops: As droplets of colostrum appear on your nipple, use the tip of the sterile syringe to suck them up. Alternatively, you can let them drip into your clean container and draw them up from there.
- Rotate Your Hand: To drain all areas of the breast, rotate the position of your ‘C’ shape around the areola (imagine the positions on a clock face: 12 & 6, 3 & 9, etc.).
- Switch Sides: Spend about 5-10 minutes on one breast, then switch to the other. You can switch back and forth a few times.
Important Considerations
Aim for 1-3 short sessions per day. Listen to your body. If at any point you feel uterine cramping or contractions, stop immediately and contact your healthcare provider. It is normal to express only a few drops or less than a milliliter per session, especially at first. Consistency is more important than volume!
Proper Storage: Keeping Your Harvested Colostrum Safe
Proper Storage: Keeping Your Harvested Colostrum Safe
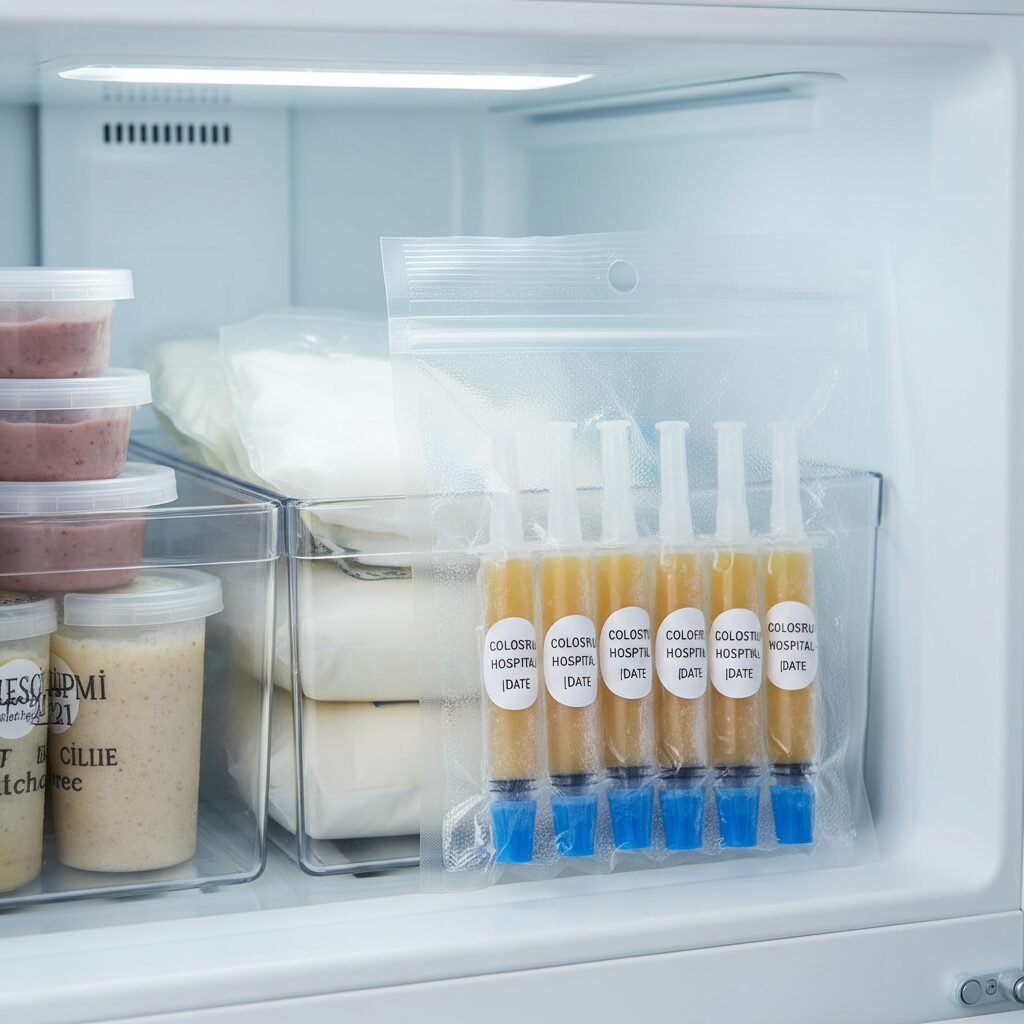
You’ve successfully harvested your liquid gold—now what? Proper storage is crucial to ensure it remains safe for your baby. Hygiene is non-negotiable at every step.
Labeling and Collection
Each syringe must be clearly labeled with a permanent marker. Include:
- Your full name
- The date of expression
- The time of expression
After each session, you can either use a new syringe or add freshly expressed colostrum to a syringe already in the fridge from the same day. Do not add warm, fresh colostrum to frozen colostrum. Once a syringe is full or you are done for the day, cap it tightly and move it to the freezer.
Storage Guidelines
Follow these guidelines, which are based on standards for handling human milk, to ensure the safety and quality of your colostrum.
| Storage Location | Maximum Safe Storage Time | Important Notes |
|---|---|---|
| Room Temperature (up to 77°F or 25°C) | Up to 4 hours | Best practice is to refrigerate as soon as possible. |
| Refrigerator (at 39°F or 4°C) | Up to 48 hours | Store at the back of the fridge, not in the door, where the temperature is most stable. |
| Freezer (in a standard freezer at 0°F or -18°C) | Up to 6 months | For optimal quality, using it within 3 months is recommended. |
Transporting to the Hospital or Birth Center
When it’s time to go to the hospital, you’ll want to bring your frozen colostrum with you.
- Place all the frozen, labeled syringes together in a small, sealed plastic bag.
- Put the bag into a small insulated cooler or lunch bag with a frozen ice pack.
- Inform the nursing staff upon your arrival that you have a supply of expressed colostrum. They will assist you in storing it properly in a designated freezer or refrigerator until it is needed.
Having this supply ready can bring immense peace of mind, allowing you to focus on your labor and birth, knowing you have a nutritional safety net prepared for your little one.
Conclusion
Your Journey, Your Success
Embarking on the journey of antenatal colostrum harvesting is a profound act of love and preparation. It is an opportunity to connect with your body’s incredible capabilities and to provide a powerful head start for your baby. Whether you collect several milliliters or just a few precious drops, every bit is a testament to your dedication.
Equally important, please remember that your ability (or inability) to express colostrum before birth is not an indicator of your future milk supply. Many parents who can’t express a single drop go on to have abundant milk and successful breastfeeding relationships. This is simply one tool in a vast parenting toolkit—a bonus, not a requirement. Be gentle with yourself, celebrate your efforts, and trust in the amazing journey ahead.
You are preparing, you are learning, and you are ready. You’ve got this.
Medical Disclaimer: The information provided in this article is for educational and informational purposes only and is not intended as medical advice. It is not a substitute for professional medical advice, diagnosis, or treatment. Always seek the advice of your physician, midwife, or other qualified health provider with any questions you may have regarding a medical condition. Never disregard professional medical advice or delay in seeking it because of something you have read in this article.