High End Nursery On A Budget: 10 Genius Dollar Tree DIYs
The nesting instinct is a powerful force. As you prepare for your little one’s arrival, the desire to create a perfect, serene, and beautiful nursery can feel all-consuming. You scroll through images of flawlessly designed rooms, filled with expensive furniture and boutique decor, and a wave of anxiety might hit: How can we possibly afford this?
As a doula and maternal health educator, I’ve supported countless families through this exact emotional journey. The pressure to provide the ‘best’ of everything is immense, but I want to share a foundational truth: a beautiful nursery is not measured by its price tag. It is measured by the love, care, and creativity poured into it. Your baby needs a safe space filled with your love, not a room full of designer labels.
This guide is designed to bridge the gap between your high-end vision and your real-world budget. We’re going to unlock the surprising potential of one of the most accessible stores around: Dollar Tree. Forget flimsy party supplies; we’re transforming basic items into chic, durable, and personalized decor that looks like it came from a high-end catalog. These 10 genius DIYs are simple, satisfying, and will help you build a nursery that is not only stunning but also deeply meaningful.
DIY #1: Gilded Animal Figurine Decor

One of the easiest ways to elevate a space is with metallic accents. Small, whimsical animal figurines are a staple in upscale nursery decor, often used as bookends or shelf decorations. Instead of paying $20-$30 per piece, you can create a whole menagerie for just a few dollars.
Materials Needed:
- Plastic animal figurines (dinosaurs, safari animals, farm animals)
- Metallic spray paint (gold, silver, or rose gold – you may need to purchase this from a hardware store, but it’s a small investment for multiple projects)
- Scrap cardboard or newspaper
Step-by-Step Instructions:
- Ensure your animal figurines are clean and dry. If they have any stickers, remove them completely.
- In a well-ventilated area (preferably outdoors), lay down your cardboard or newspaper to protect the surface.
- Arrange the plastic animals on the cardboard, leaving space between them.
- Apply a thin, even coat of metallic spray paint to the animals. The key is to use light, sweeping motions to avoid drips.
- Let the first coat dry completely, which usually takes about 20-30 minutes.
- Flip the animals over and apply a second coat to cover any missed spots. Repeat until they are fully and evenly coated.
- Let them cure for at least 24 hours before placing them in the nursery. This ensures the paint is fully hardened and any fumes have dissipated.
Pro-Tip:
For a heavier, more substantial feel, you can glue each animal to a small, painted wooden block, also available at most craft stores or sometimes at Dollar Tree. This transforms them into perfect, sturdy bookends.
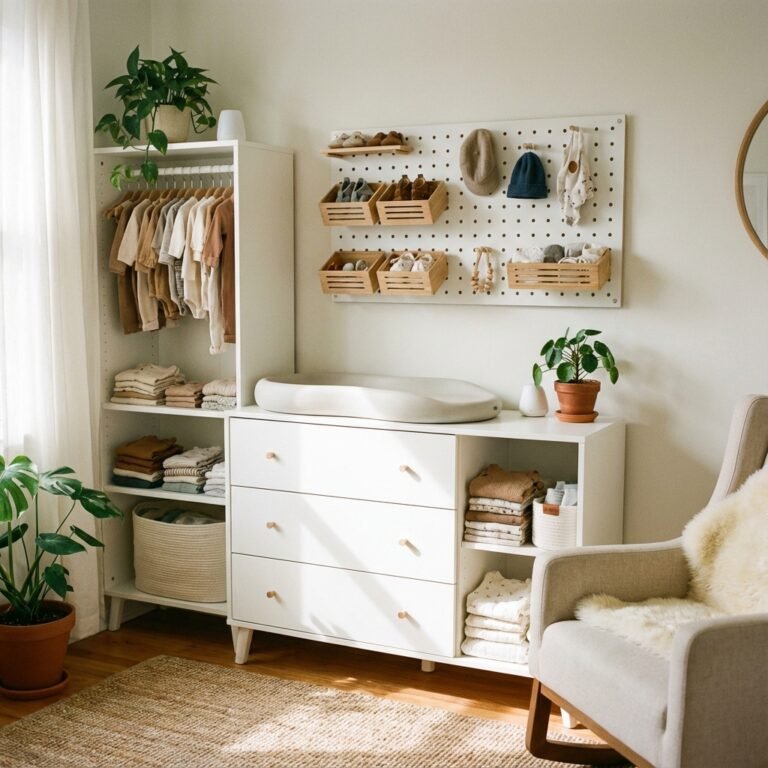
DIY #2: Chic Rope-Wrapped Storage Baskets

Storage is paramount in a nursery, but stylish baskets can be surprisingly expensive. This hack transforms basic plastic bins into textured, neutral-toned baskets that look like they belong in a coastal-themed boutique.
Materials Needed:
- Plastic storage bins or buckets
- Nautical rope or jute twine
- Hot glue gun and plenty of glue sticks
- Scissors
Step-by-Step Instructions:
- Start at the bottom edge of the plastic bin. Apply a line of hot glue a few inches long.
- Press the end of the rope firmly into the glue. Hold it for a few seconds until it sets.
- Continue applying glue in short sections and tightly wrapping the rope around the bin. It’s crucial to push each new layer of rope snugly against the previous one to avoid gaps.
- Work your way up the entire bin. This process is meditative but requires patience to keep the lines straight.
- When you reach the top rim, cut the rope, leaving a clean edge. Secure the end with a generous dab of hot glue, tucking it in neatly.
- If your bin has handles, you can either cut the rope and restart on the other side or carefully wrap the rope around the handles for a more integrated look.
Pro-Tip:
For a two-toned look, you can paint the bottom half of the basket with acrylic paint before you start wrapping, or switch to a different color rope halfway up. You can also create a simple tassel from yarn to hang off the side for extra flair.
DIY #3: Elegant Faux Floral & Greenery Mobile

A beautiful mobile can be the centerpiece of a nursery, but designer versions can cost upwards of $100. You can create a delicate, whimsical mobile that is just as stunning with a few simple craft supplies.
Materials Needed:
- A small embroidery hoop (just the inner ring) or a metal floral hoop
- Faux flowers, succulents, or greenery stems
- Fishing line or clear thread
- Hot glue gun or floral wire
- Twine or ribbon for hanging
Step-by-Step Instructions:
- First, decide on your design. You can wrap the entire hoop in greenery or leave the wood/metal exposed for a more minimalist look.
- If wrapping, use hot glue or thin floral wire to secure the stems of your greenery around the hoop.
- Select the flowers or leaves you want to hang down. Cut individual stems or small bunches.
- Cut varying lengths of fishing line. This will give the mobile a lovely, cascading effect.
- Securely tie one end of a piece of fishing line to the stem of a flower or leaf. You can add a tiny dab of hot glue over the knot for extra security.
- Tie the other end of the fishing line to the hoop, spacing them out as you like.
- Once all your floral elements are hanging, create a hanger. Cut three or four long, equal-length pieces of twine or ribbon.
- Tie them evenly spaced around the hoop, then bring the ends together at the top and tie a secure knot, creating a loop to hang it from a ceiling hook.
Safety First: Always ensure the mobile is hung securely and well out of your baby’s reach. It is a decorative item, not a toy.
DIY #4: Curated Nursery Wall Art Gallery

A gallery wall adds a huge amount of personality to a room. With Dollar Tree frames, you can create a large, impactful display for the cost of a single print from a big-box store.
Materials Needed:
- An assortment of picture frames in various sizes
- Spray paint (optional, for a uniform color)
- Art inserts: You can use free printables from online, beautiful scrapbook paper, fabric swatches, or even sentimental items like pages from a favorite childhood book.
- Picture hanging strips for damage-free wall mounting
Step-by-Step Instructions:
- Remove the glass and backing from all the frames. If you want a cohesive look, spray paint all the frames in the same color (e.g., white, black, or gold). Let them dry completely.
- Prepare your artwork. Print your chosen designs, cut your scrapbook paper or fabric to fit the frames.
- Carefully reassemble the frames with your new artwork inside. Ensure the glass is clean and free of fingerprints.
- Plan your layout. Arrange the frames on the floor first to figure out the best configuration before you start putting them on the wall. Take a picture with your phone to remember the layout.
- Use a level and a measuring tape to hang your frames using picture hanging strips. This makes it easy to adjust the placement without creating nail holes.
Pro-Tip:
Incorporate different textures for a high-end feel. Frame a piece of burlap, a textured wallpaper sample, or a pressed leaf alongside your printed art.
DIY #5: Custom Drawer Organizers

Baby clothes are tiny, and drawers can quickly become a chaotic mess. Custom drawer organizers are a sanity-saver, and you don’t need to buy expensive pre-made systems.
Materials Needed:
- Small plastic bins/baskets (the rectangular ones work best)
- OR sheets of foam board
- Ruler and craft knife (if using foam board)
- Hot glue gun (if using foam board)
Step-by-Step Instructions (Plastic Bin Method):
- Measure the interior dimensions of your nursery drawers.
- Take your measurements to Dollar Tree and play a game of ‘Tetris’ with the various small bins and baskets to find a combination that fits snugly inside your drawer.
- Arrange the bins inside the drawer to create separate compartments for socks, hats, onesies, pants, etc. You can use a bit of museum putty on the bottom to keep them from sliding.
Step-by-Step Instructions (Foam Board Method):
- Measure the height, width, and depth of your drawer.
- Cut a piece of foam board to fit the bottom of the drawer.
- Measure and cut long strips of foam board to match the drawer’s height. These will be your dividers.
- Plan your grid layout. Cut notches halfway through the dividers where they will intersect, allowing them to slot together like a grid.
- Assemble your grid and secure the joints with a small amount of hot glue. Place the entire insert into the drawer.
DIY #6: Upcycled Glass Jar Canisters

Keep essentials like cotton balls, pacifiers, or diaper rash cream handy and stylishly stored on the changing table. This project turns simple glass jars into chic apothecary-style canisters.
Materials Needed:
- Glass jars with lids (candle jars after the wax is removed, or food jars)
- Small wooden knobs or decorative cabinet pulls
- Spray paint in your desired color
- Strong adhesive like E6000 or a hot glue gun
Step-by-Step Instructions:
- Thoroughly clean the glass jars and their lids, removing any labels and adhesive residue.
- In a well-ventilated area, spray paint the lids. Apply two or three light coats for full coverage, allowing them to dry between coats.
- If you are also painting your knobs, do so at the same time.
- Once the paint is fully cured (wait 24 hours), it’s time to attach the knobs.
- Apply a generous dot of E6000 or hot glue to the bottom of the knob.
- Press the knob firmly onto the center of the lid. If using E6000, you may need to let it set for a few hours to fully bond.
- Fill your new canisters with nursery essentials and display them proudly.
DIY #7: Tiered Tray Diaper Caddy

A tiered tray is a versatile organizing tool, perfect for a diaper changing station. It corrals all your essentials into one vertical, space-saving spot. This classic DIY hack is incredibly easy and looks fantastic.
Materials Needed:
- Two round metal pizza pans or burner covers (one small, one large)
- One glass candlestick holder
- Strong adhesive (E6000 is recommended for durability)
- Spray paint
Step-by-Step Instructions:
- Clean all your components (pans and candlestick) to ensure they are free of dust and grease.
- In a well-ventilated area, spray paint all the pieces in your color of choice. White, black, or a metallic shade works beautifully. Apply several light coats for a smooth finish.
- Let the paint cure completely as per the instructions on the can.
- Time for assembly. Find the exact center of the larger pan. Apply a ring of E6000 adhesive to the bottom rim of the candlestick holder.
- Carefully place the candlestick holder onto the center of the large pan. Let it set for at least an hour.
- Now, apply a ring of adhesive to the top rim of the candlestick holder.
- Center the smaller pan on top and press down gently.
- Let the entire structure cure, untouched, for at least 24-48 hours to ensure a strong, permanent bond before you load it up with supplies.
DIY #8: Custom Closet Dividers

You will likely receive clothes in a range of sizes. Closet dividers are a game-changer for keeping that tiny wardrobe organized. Instead of buying a pre-made set, you can create custom ones that match your nursery’s theme.
Materials Needed:
- Blank wooden gift tags or sturdy cardstock/foam board
- A craft knife and a round object to trace (if not using pre-made tags)
- Fine-tip permanent marker or letter stickers
- Decorative elements like ribbon, washi tape, or paint (optional)
Step-by-Step Instructions:
- If you’re making your own dividers from cardstock or foam board, trace a large circle (like from a wide-mouth jar) and a smaller circle in the middle for the closet rod. Cut it out carefully with a craft knife, including a slit from the outer edge to the inner circle so it can slip onto the rod.
- If using pre-made tags, you’re ready to decorate.
- Decide on your size categories: Newborn, 0-3 Months, 3-6 Months, 6-9 Months, 9-12 Months, etc.
- Using your best handwriting with a marker, or for a cleaner look, using letter stickers, label each divider.
- Add any decorative touches you like. A strip of washi tape along the bottom or a small painted design can tie them into your nursery’s color scheme.
- Slip them onto the closet rod and organize those tiny outfits!
DIY #9: High-Impact Sunburst Mirror

Mirrors make a room feel bigger and brighter. A sunburst or starburst mirror is a classic design piece that can be very expensive. This DIY version uses simple materials to create a large, dramatic piece of wall art for just a few dollars.
Materials Needed:
- A small, round craft mirror
- Wooden dowels or bamboo skewers
- Hot glue gun
- A piece of cardboard larger than your mirror
- Spray paint
Step-by-Step Instructions:
- Cut a circle from the cardboard that is slightly smaller than your mirror. This will be your backing.
- Begin gluing your dowels or skewers to the back of the cardboard circle, radiating outwards. Create a pattern by alternating long and short pieces, or group them in clusters.
- Continue gluing until you have a full, dense ‘sunburst’ effect. Use plenty of glue to ensure they are secure.
- Once the glue is completely cool and hard, take the entire piece to a well-ventilated area.
- Spray paint the entire thing—dowels and cardboard backing—in your chosen color. Gold or silver gives a classic glam look, while white or a pastel color can be softer.
- After the paint is dry, apply a generous amount of hot glue or strong adhesive to the cardboard backing.
- Carefully press the mirror onto the center of the cardboard, covering the base of the dowels. Let it set completely before hanging.
DIY #10: No-Sew Fabric Bunting Banner

A fabric bunting adds a touch of softness and celebration to a nursery. It’s perfect for hanging over a window, a crib, or along a bare wall. This no-sew version is quick, easy, and completely customizable.
Materials Needed:
- Fabric quarters or bandanas in coordinating colors/patterns
- Twine or ribbon
- Pinking shears or regular scissors
- Hot glue gun
- Cardboard for a template
Step-by-Step Instructions:
- Create a triangle template from your cardboard. A good size is about 6 inches wide at the top and 8 inches long.
- Use your template to trace and cut out triangles from your fabric. Using pinking shears will give the edges a nice zig-zag finish and help prevent fraying.
- Lay out your length of twine or ribbon. Arrange your fabric triangles in the order you want them.
- One by one, attach the triangles to the twine. Run a thin line of hot glue along the top edge of a triangle and fold it over the twine, pressing firmly.
- Leave a few inches of space between each triangle for a balanced look.
- Continue until your banner is the desired length. Be sure to leave extra twine on both ends for easy hanging.
Pro-Tip:
Instead of triangles, you can simply cut long, thin strips of fabric (about 1 inch wide and 12 inches long) and tie them directly onto the twine for a more rustic, shabby-chic garland.
Conclusion
Stepping back to admire the nursery you’ve built with your own hands is an incredibly rewarding feeling. Each project, from the gilded animals on the shelf to the custom baskets holding tiny socks, is a testament to your love, resourcefulness, and dedication. You have created a high-end, personalized sanctuary for your baby not in spite of your budget, but because of it. Your creativity transformed simple materials into something truly special.
Remember, as you embark on this beautiful, chaotic, and wonderful journey of parenthood, that what your child will cherish most is not the cost of their surroundings, but the comfort and love within them. You are already providing the very best. Trust your instincts, embrace your creativity, and know that you are building a beautiful life for your little one, one thoughtful detail at a time.