DIY Newborn Passport Photos: How To Get The Shot Without The Meltdown
Planning your first family trip is an incredibly exciting milestone. You envision sandy toes, new sights, and precious memories. But then, reality hits: your tiny new human needs a passport. And a passport needs a photo. The very thought of taking a squirming, unpredictable newborn to a stuffy photo booth or pharmacy can send any new parent’s anxiety into overdrive. What if they cry? What if they won’t open their eyes? How do you even get them to look at the camera?
Deep breath. We’re here to tell you that not only can you take your newborn’s passport photo at home, but you can do it calmly and successfully. This guide is designed by parents, for parents, to walk you through the entire process, from understanding the strict government rules to setting up your own mini-studio and capturing that perfect, compliant shot. Taking the DIY route saves you time, money, and most importantly, allows you to work on your baby’s schedule, turning a potentially stressful errand into a manageable (and maybe even sweet) moment at home.
Understanding the Official Requirements: The Non-Negotiables
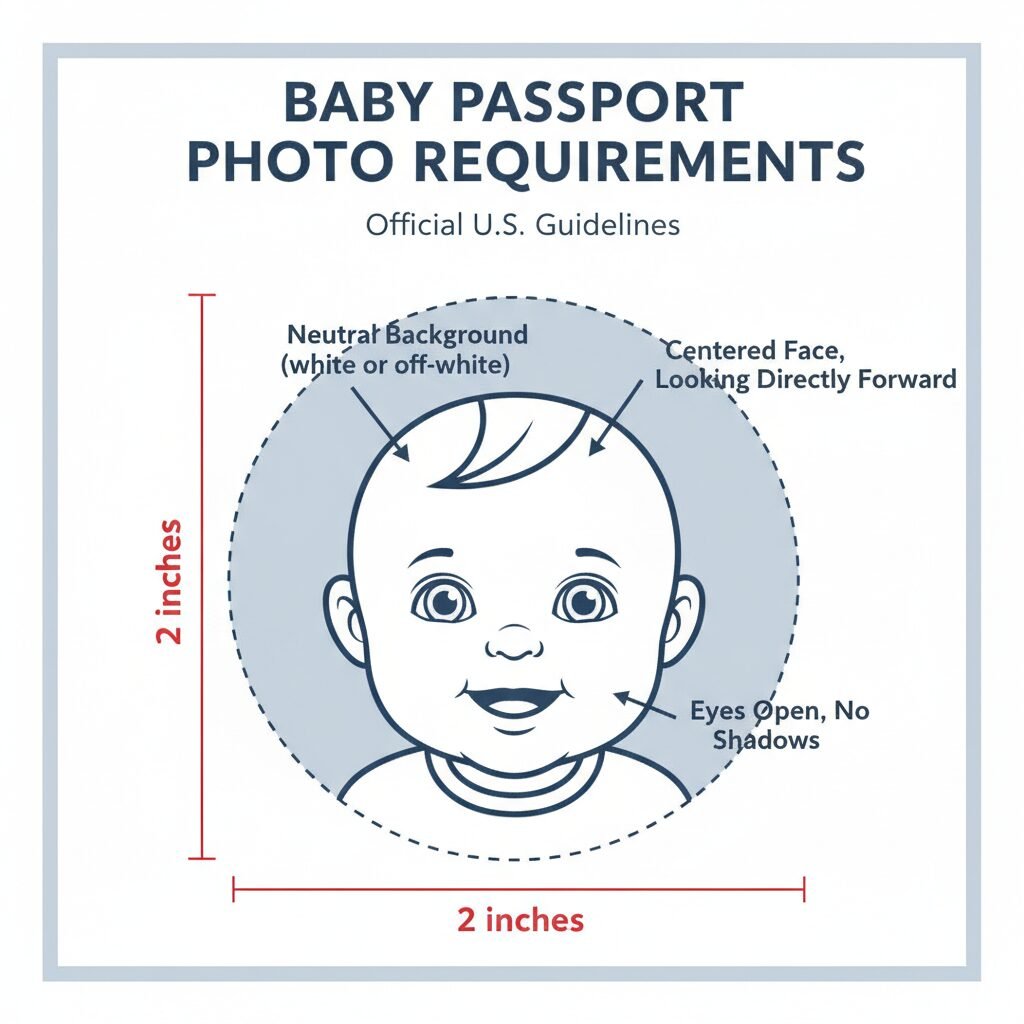
Before you even pick up your camera, it’s crucial to understand the strict rules set by government agencies (like the U.S. Department of State). These aren’t suggestions; if your photo doesn’t meet these criteria, your application will be rejected, causing delays and frustration. Familiarize yourself with these core requirements to ensure you get it right from the start.
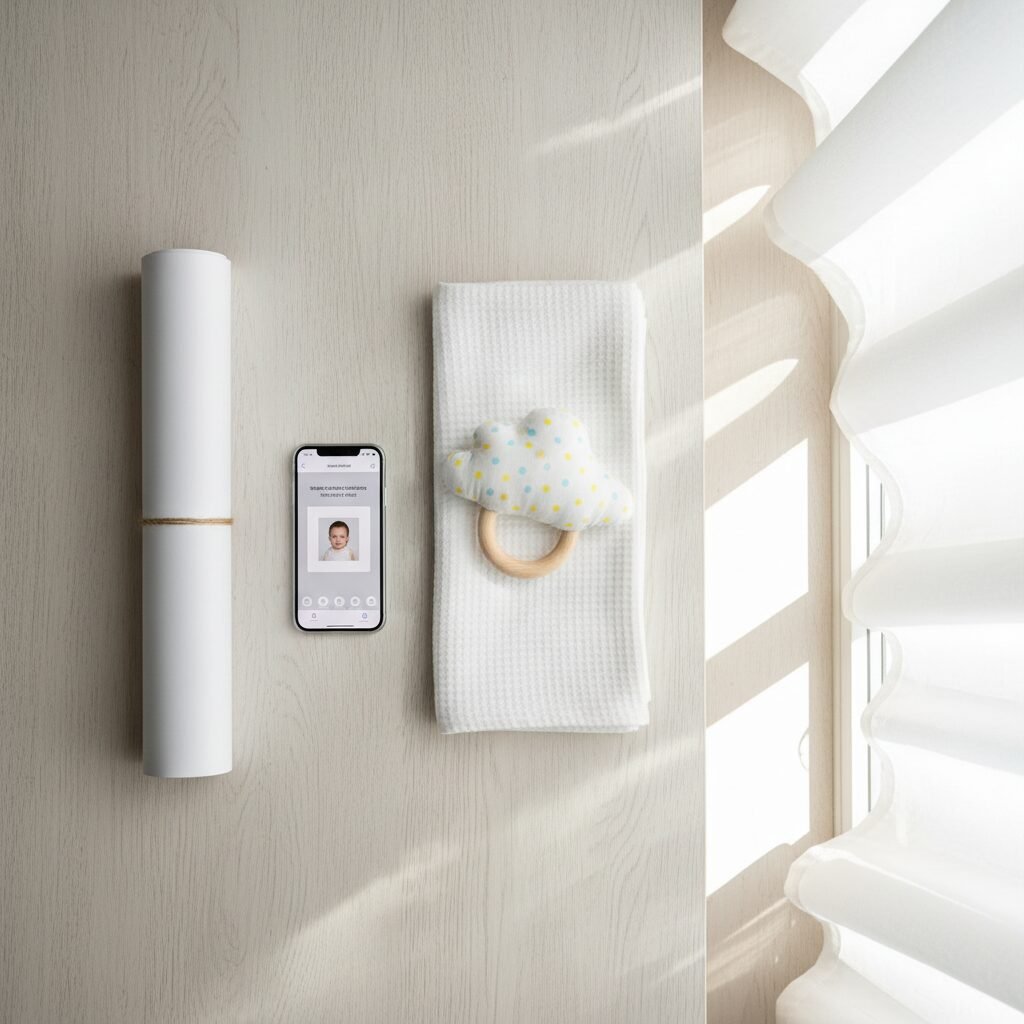
- Background: The background must be plain white or off-white. There can be no patterns, textures, or shadows. A simple white poster board or a smooth, ironed white sheet is perfect.
- Photo Size and Quality: The photo must be 2×2 inches (51×51 mm) and printed on matte or glossy photo-quality paper. It must be in color, clear, and free of any pixelation or damage.
- Head Position: The baby’s head must be centered in the frame and face the camera directly. Their full face, from the top of their hair to the bottom of their chin, must be visible.
- Eyes Open: This is often the trickiest part with newborns. The baby’s eyes must be fully open and visible. If their eyes are closed or mostly closed, the photo will be rejected.
- Neutral Expression: A neutral expression or a small, gentle smile is acceptable. Big, toothy grins or crying faces are not. For a newborn, this usually means a calm, relaxed face.
- No Shadows: There should be no shadows on the baby’s face or on the background behind them. This is why lighting is so important.
- No Accessories: The baby cannot wear hats, headbands, or bows. Pacifiers are also not allowed. Their ears should be visible if possible.
- Solo Shot: The baby must be the only person in the photo. You cannot have your hands or arms visible holding them up.
These rules might seem daunting, but knowing them is half the battle. By preparing with these guidelines in mind, you set yourself up for success.
Gathering Your Gear: The At-Home Photo Studio Setup
You don’t need professional photography equipment to get a great result. Most of what you need is likely already in your home. The key is creating a safe, comfortable, and well-lit environment for your baby.
Essential Equipment Checklist:
- A Good Camera: A modern smartphone camera is more than sufficient. Ensure the lens is clean before you start.
- The Perfect Background: A large piece of white poster board or a crisp, ironed white flat sheet works perfectly. Avoid anything with a texture or pattern.
- Natural Light Source: The best light is indirect natural light. Set up your ‘studio’ near a large window on an overcast day or in a spot that isn’t in direct, harsh sunlight. Turn off all overhead lights and lamps to avoid mixed lighting and strange color casts.
- Baby Support System: Since newborns can’t sit up, you’ll need a way to support them safely. A bouncy seat, a Bumbo seat, or even their car seat are great options. You will drape your white sheet or poster board over the seat to create a seamless white background. Alternatively, you can lay the baby on their back on the white sheet on the floor.
- A Helper: This isn’t gear, but it’s essential! Having a partner, friend, or family member to help can be a game-changer. One person can focus on the camera while the other gets the baby’s attention.
- Attention-Getters (Optional): A quiet rattle, a crinkly toy, or even your own funny faces can help draw your baby’s gaze toward the camera. Choose something that won’t make them overly excited or cause a huge grin.
Set everything up before you bring your baby into the space. This minimizes fuss and ensures that when you have that perfect, calm moment, you’re ready to capture it instantly.
The Step-by-Step Guide to Capturing the Perfect Shot
With your space prepared and your baby ready, it’s time to take the photo. Remember, this is a marathon, not a sprint. Patience is your most valuable tool. Follow these steps for a smooth process.
- Timing is Everything: The absolute best time for this task is after your baby has been fed, burped, and had a diaper change. A happy, comfortable baby is a cooperative baby. Aim for a time when they are naturally awake and alert, but not overly tired or fussy.
- Set the Scene: Place your chosen baby seat near the window. Drape the white sheet or poster board over it, ensuring it’s smooth and covers any part of the seat that might appear in the shot. If you’re laying your baby down, place the sheet on the floor.
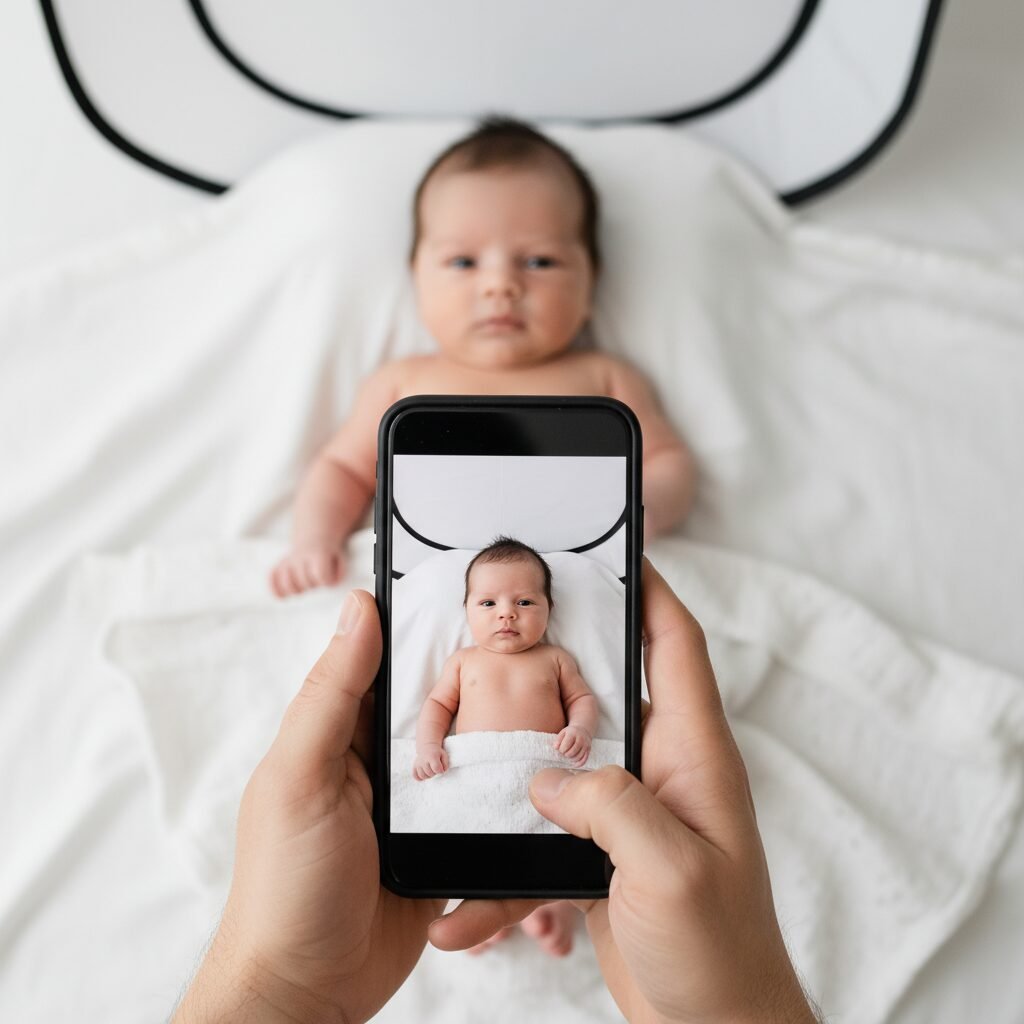
- Position Your Baby: Safely place your baby in the seat or on their back. If they are in a seat, ensure their head is supported and they are sitting as upright as possible. If on their back, you’ll be shooting from directly overhead. Use rolled-up receiving blankets on either side of their body (out of the camera frame) to help keep them centered and secure.
- Get Their Attention: This is where your helper comes in handy. Have them stand directly behind the camera and use a quiet toy or their face to gently draw the baby’s gaze forward. The goal is to have them looking straight at the lens. Avoid loud noises that might startle them.
- Frame the Shot: Position your phone or camera at your baby’s eye level. Make sure you are not tilting the camera up or down. Leave some space around their head for cropping later, but ensure their head and shoulders are the primary focus. Check for shadows on their face or the background and adjust your position or the baby’s slightly to eliminate them.
- Use Burst Mode: Don’t try to get the perfect shot in one click. Use your phone’s burst mode (holding down the shutter button) to take a rapid series of photos. This dramatically increases your chances of catching that split-second moment when their eyes are open and their expression is neutral. Take way more photos than you think you’ll need.
Common Pitfalls and Pro-Tips for a Meltdown-Free Session
Even with the best preparation, you might encounter a few challenges. Here’s how to troubleshoot common issues with a calm and supportive approach.
What if my baby won’t open their eyes?
Newborns sleep a lot! Don’t force it. If they are sleepy, take a break and try again later. Sometimes, a gentle tickle on their cheek or softly saying their name can cause them to open their eyes for a moment. Be ready with burst mode to capture it. A well-lit room also encourages them to open their eyes more than a dim one.
How do I get rid of shadows?
Shadows are usually caused by a single, direct light source. Using indirect natural light from a window is the best defense. If you’re still seeing shadows, try diffusing the light by hanging a thin white sheet over the window. Also, make sure you are not standing between the light source and your baby, as you will cast a shadow yourself.
My baby keeps slumping or turning their head.
This is completely normal. Use small, rolled-up blankets tucked securely beside their body and head (just outside the frame) to provide gentle support. Never leave your baby unattended in this position. If they are on their back, this is less of an issue.
Remember this: Your baby can sense your stress. If you feel yourself getting frustrated, take a break. Cuddle your baby, have a cup of tea, and try again in an hour or even the next day. This isn’t a task to be rushed. Your calm energy is the most important tool you have.
Editing and Printing: The Final Steps to a Compliant Photo
You’ve captured the image! Now for the final technical steps. It’s critical to note that you cannot digitally alter the photo in any way that changes your baby’s appearance. No removing blemishes, no changing colors, and no using filters.
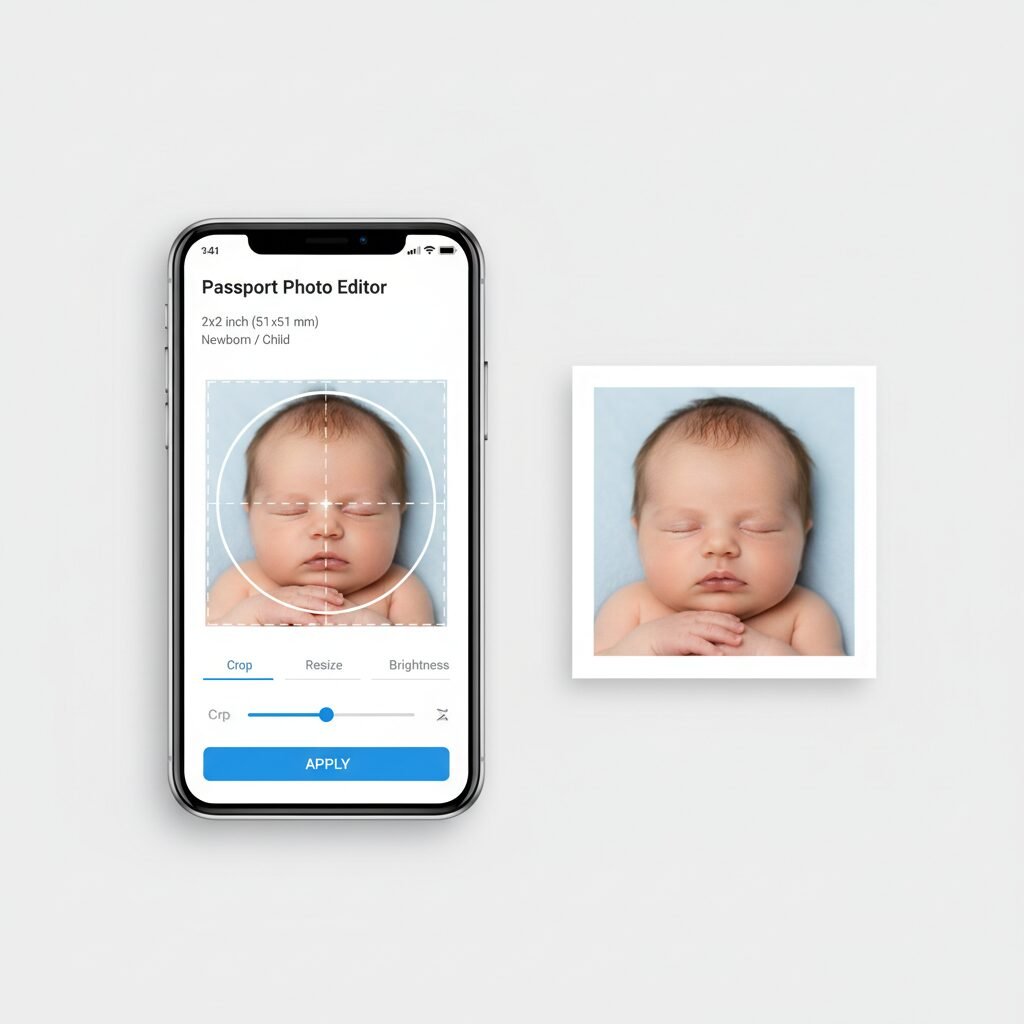
Cropping to Size:
The only ‘editing’ you should do is cropping. The final photo must be 2×2 inches. Your baby’s head must be between 1 and 1 3/8 inches (25 and 35 mm) from the bottom of the chin to the top of the head. Many free online tools and apps can help with this. Search for a ‘passport photo tool’ or ‘passport photo template’. These tools will provide an overlay that shows you exactly how to crop your photo to meet the official requirements.
Printing Your Photo:
Once you have your perfectly cropped digital image, you need to print it. Do not print it on a home printer using regular paper. The photo must be on photo-quality paper, either matte or glossy.
- Local Pharmacy or Superstore: Most drugstores (like CVS, Walgreens) or big-box stores (like Walmart, Target) have photo centers that can print your photo in minutes. Simply upload the image from your phone to their app or use their in-store kiosk. Select the 2×2 inch print size. Many even have a ‘passport photo’ option that will print a pair of them for you.
- Online Printing Services: Websites like Shutterfly or even the U.S. State Department’s preferred online photo tool providers can print and mail the photos to you. This is a good option if you’re not in a rush.
Always order at least two copies, just in case one gets damaged during the application process. Once you have the physical photos in hand, you are ready to complete your baby’s passport application.
Conclusion
You Did It!
Taking your newborn’s passport photo at home is a significant accomplishment that saves you a world of stress. By understanding the rules, preparing your space, and approaching the task with a mountain of patience, you’ve successfully navigated one of the first bureaucratic hurdles of parenthood. You’ve not only captured a compliant photo but also created a memory in the comfort of your own home, on your own terms.
Now, with this task checked off your list, you can get back to the exciting part: planning the incredible adventures you and your growing family will have together. That little 2×2 inch photo is more than just a document; it’s a ticket to a world of new experiences. Well done, parents.